Concord & 9th— Flower Press Birthday Card

Happy Friday!
I’m back with another Friday post, this time featuring a 96th birthday card! My husband’s Grandma is turning 96 in a couple weeks, and I know she loves getting cards from us, so I had to make a special one! Last year I made her this card using a cake die from Altenew, and this year I wanted to do something a little different. I’ve been wanting to use the Flower Press stencil that Concord & 9th released in April, and I’m so glad I got to on this card! It’s such a great multipurpose stencil, it would work for birthdays, baby showers, spring/easter, literally anything that flowers could go with!
As I’ve been doing lately, I started out by picking out a color palette using Pinterest. I had a picture in my mind that I wanted a light, airy, multicolored result, so I searched for dreamy bouquets and settled on this pin to use as my color inspiration. I created my color swatch for my Swatchbook using Sweet Pea, Nectar, Buttercup, Sprout, Parsely, Harbor, and Lilac cardstocks. Luckily the cardstocks are very similar to the ink colors, so this palette can work for die cutting or ink blending! After planning out what I would stencil which color, I realized I wouldn’t be using either of the greens on this card, which is a little bit of a bummer since they brought a lot of balance to the color palette, but that’s okay! I still think this panel turned out great.
I started out by cutting a piece of C9 white cardstock down to 6 x 6-inches since it would allow me to stencil easily while using my Waffle Flower stencil mat, and it would allow me to choose what part of the stenciled panel I wanted to crop for my card front. I started out by blending on the largest flowers in Nectar, then left the small flower centerson this stencil for last. I moved on the next stencil and blended on Sweet Pea ink to the coneflowers using a light hand (this ink packs a punch!) then went a little heavier toward the flower center. I blended on Buttercup ink for the Nectar flower centers, then moved on to the next stencil. For the small daisy-like flowers, I chose to blend them in Harbor ink since they reminded me of the light blue flowers in my inspiration photo. To finish off the flowers, I stenciled the tulip-like flowers in Lilac ink, and I really love how these colors all look together! However, my Harbor flowers still needed flower centers! Since I wanted them to be yellow centers, and I couldn’t blend yellow over the blue ink without turning it green, I pulled out my white pigment ink and blended it on with a little bit of a heavy hand. While waiting for the ink to dry, I quickly went to clean off my stencil and get ready for the next step. With the ink dry, I lined the stencil back up then blended Buttercup ink on, and voilà! Perfectly yellow flower centers on blue flowers! If this would have failed me, I did think about adding yellow enamel dots/pearls, or die cut circles for flower centers, so that is always an option!
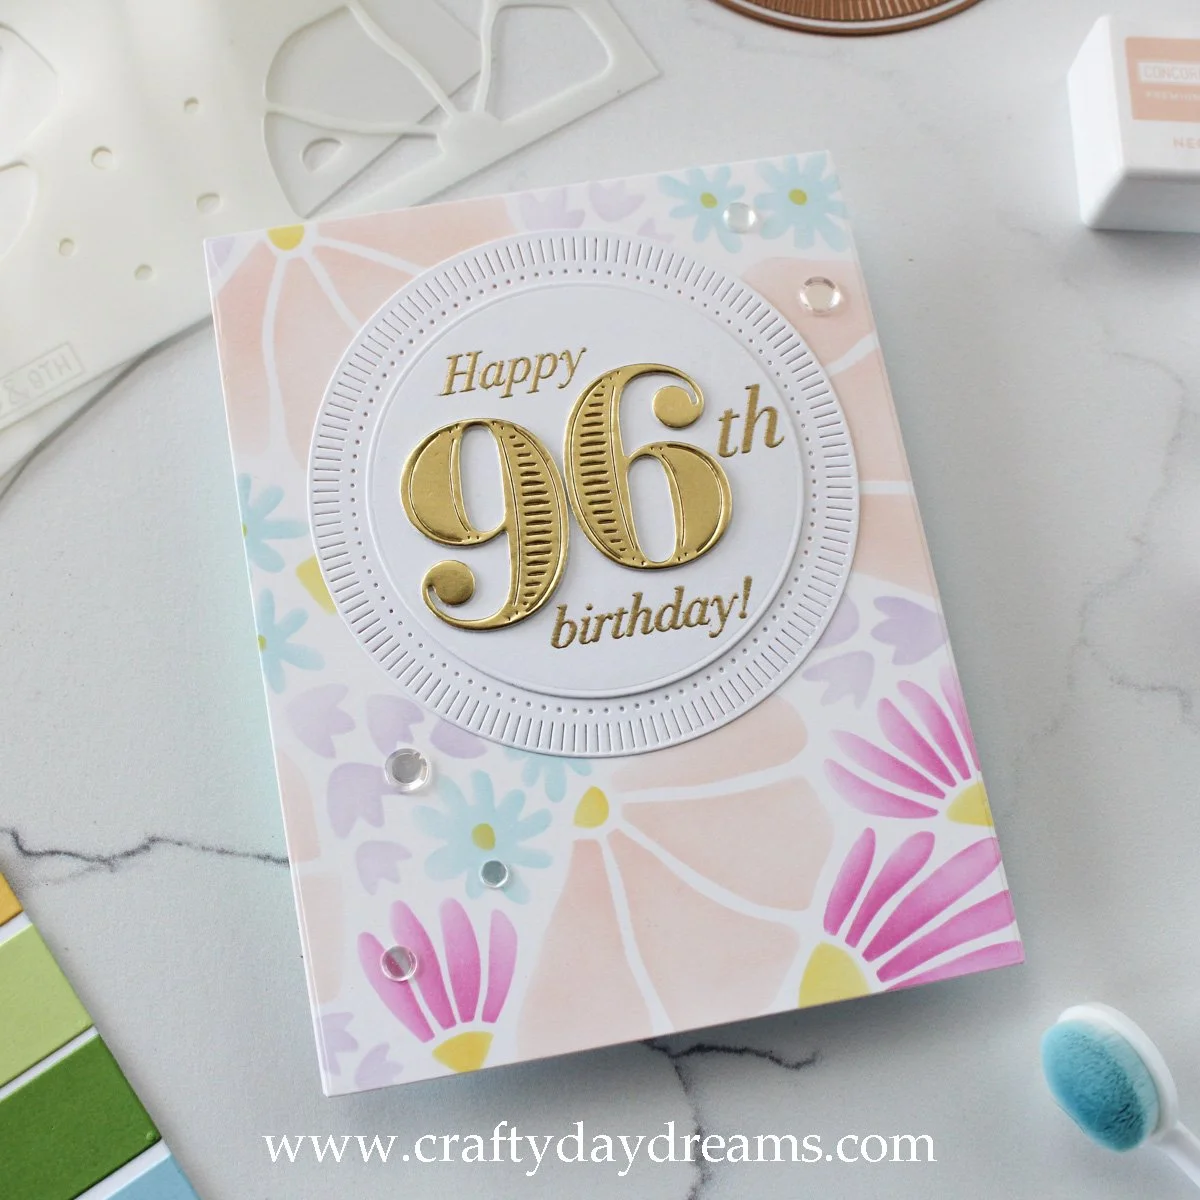
With my panel completed, I cropped it using my A2 Layers dies. I like using these even though cutting it down to A2 size wouldn’t be too terribly hard, but this allows me to see what my panel would look like before cutting it, which is always a plus!
Now onto the sentiment! Originally, I had just planned on the sentiment being the 96 on a circle die cut since my husband’s grandma, lovingly called Bonne Maman, is predominantly a French speaker, and I don’t have many French sentiments. After spending a lot of time browsing for French sentiments (if you know any, please drop them in the comments below!) and not finding any that I was dying to buy, I texted my mother-in-law and found out that Bonne Maman does understand a bit of English. Once I knew this, I knew I had the perfect stamp set to go along with my numbers.
I pulled out the Bold Numbers dies from The Greetery, which I love and don’t use enough, and die cut them out of one layer of plain white cardstock, and one layer of matte gold cardstock. To continue building my focal sentiment, I pulled out the Fluted Circles dies from Spellbinders and die cut the middle-sized one. After die cutting this circle, I decided I wanted to add some dimension by layering a circle on top of the fluted one, so I took the next die down in size in the set and cut it out of plain white cardstock. I pulled out my mini-MISTI and the Digit Sentiments stamp set and settled on using the ‘happy’, ‘-th’, and ‘birthday!’ stamps to create my sentiment. After a bit of fussing, I managed to squeeze all my elements onto the circle, and heat embossed them in Gilded embossing powder. This gold is a little bit different in color to the matte gold cardstock, but I didn’t like the thought of introducing black embossing to the card, so I stuck with the gold.
At this point, I decided to die cut another small circle to reinforce the one I heat embossed on, and to add a little bit more dimension. This card is making it’s way to Montréal, Canada, so I was trying to keep dimension minimal by only using paper to build it up. I glued the circle sentiment down in the middle upper portion of the card, then pulled out some Rock Candy sequins to add some shine! You could use dew drops here, but for some reason I’m super gun-shy with them! They’re so pretty, but I always get spooked and use sequins instead 😂. I settled on five sequins, leaving two on the upper right, and three on the lower left since there was more space in that part of the card.
And that finishes this card off! I hope you liked it! I know I did, I just love the stenciling! I can’t wait to write our personal messages in the card and get it sent off to Bonne Maman. I know she loves the cards I’ve sent to her, so I really hope this brightens her day!
Affiliate disclaimer: all links to Waffle Flower, Altenew, Scrapbook.com, and Spellbinders products are affiliate links. These links allow me to get a commission at no extra cost to you if you use them to shop! All other links provided are links to supplies and shops I am not affiliated with and I do not get a commission from.