Waffle Flower—More Bookish Cards!
Hello, hello and happy Tuesday!
Today I’m back with more book-themed cards featuring products from Waffle Flower’s past November release. Last week I shared an anniversary card that I made for my husband, and this week I’m sharing a birthday card and a wedding card.
Light and Bright Birthday Card
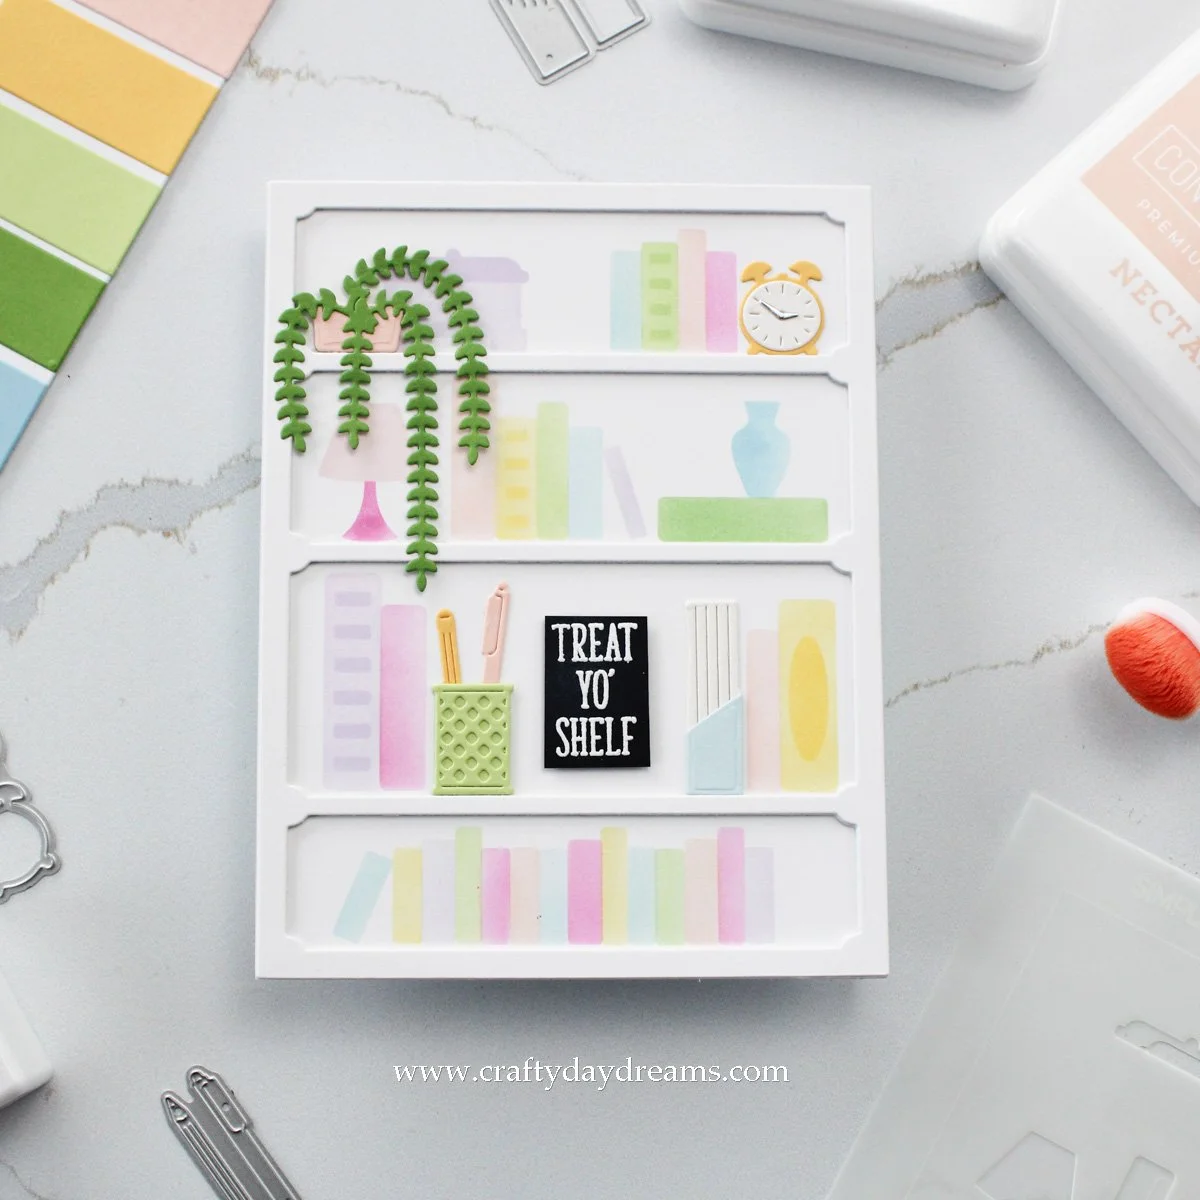
For this one, I wanted to create something that was the opposite of what I shared last week, and I think I nailed it with this blindingly bright card!! Since I had picked up the Simple Shelves Stencil Duo, I really wanted to use it on this card since my last one was so die cut heavy. So, I pulled out a piece of C9 white cardstock cut to 4.25 x 5.5-inches, my grip mat, and a bright color palette consisting of Sweet Pea, Nectar, Buttercup, Sprout, Parsley, Harbor, and Lilac inks. I’ve used this color palette in the past on a couple floral cards like this one, but I decided to use it today because I thought it would be fun to have a colorful bookshelf.
With my cardstock adhered to my grip mat, I lined up the first Simple Shelves stencil and started blending. I tried my best to get the colors spaced out in a way so that each shelf had a bit of each. This is totally not something you need to do, but my OCD was telling me I had to 😂. I repeated the same process with the second stencil, then popped my panel off my grip mat. I ended up die cutting the Simple Shelves die four times, one time with C9 white cardstock and three times with plain white cardstock, then layered them together for a dimensional shelf layer. I glued the shelf die cut over my stenciled panel, then pulled out the Shelf Additions die set and the Shelf Add-on die set. From the Shelf Add-on die set, I die cut the clock out of Buttercup cardstock, Ivory cardstock for the clock face, and matte silver for the clock hands. I die cut the drooping plant out of Parsley and Nectar cardstock for the planter, and the magazine holder out of Ivory and Harbor cardstock. From the Shelf Additions die set, I die cut the pen cup out of Sprout cardstock, and the pens out of Buttercup and Nectar cardstocks. I love the detail these die cuts add to the shelves!

To really drive home the birthday card feeling to this card, I decided to go with two sentiments. For the front of the card, I white heat embossed ‘treat yo’ shelf’ on black cardstock, then cut it down and popped it on thin foam squares in the middle of the third shelf. Now, the inside of the card really ties this together! I ended up stamping ‘this birthday will be one for the books’ on a Hero Arts Dove side folding notecard. Cute, right?! And even better, both of these sentiments came from the Simple Book Sentiments stamp set.
Now onto the Wedding Card!

I had a lot of fun creating this card! And honestly, if there wasn’t a couple in our life that was getting married this year, I definitely wouldn’t have thought to make a book-themed wedding card. For this card, I was thinking about books sitting on a shelf with a sentiments from the Simple Book Sentiments stamp set stamped on them. One thing that I truly love about this whole release from Waffle Flower is that all of their book products coordinate so well. Once again, I’m using the Simple Shelves die, which not only makes a four-shelf bookshelf, but it also creates four different sized books. To add detail to these books, there’s a coordinating stencil, called the Simple Books Stencil, that allows you to add ink blending to the books, and I love it! You really get a good bang for your buck if you pick up multiple products from this release as they all tie in together very well.
When I got to creating this card, I knew I would be making a shelf/table out of kraft cardstock, so I cut a strip of Wheat cardstock to 1-inch by 5.5-inches. I was honestly a little stuck with what colors I wanted to play with, but having recently created a vampy card, I decided to lean that way with my color palette and die cut books out of Hero Arts Plum, Ballet Slipper, and Ivory cardstocks. To the Plum book, I used white pigment ink to blend on the large spine detail, then used Ballet Slipper ink on the Ballet Slipper book, and Cosmic Berry fresh dye ink on the Ivory book. Once that ink blending dried back, I used a foam dome blending tool and applied Versamark ink to the small details (I guess what would usually be foiled on books) on the stencil, then added Gilded embossing powder to try to mimic gold foiling. Once the books had cooled, I set up a jig using a scrap die cut of the Simple Shelves die and popped the books on my grip mat in my mini MISTI. I lined up the ‘Love Story’, ‘And they lived happily ever after’, and the ‘Congratulations’ sentiments on each book, then white heat embossed them.
With my books ready to go, I could build the rest of the card. I decided to go for a white ‘wall’ as my background, but I didn’t want it to feel to plain. I dug through my stash looking for a stitched cover plate that fit the vibe I was looking for, but I didn’t find one. I decided a 3D embossing folder would have to do, so I pulled out the Luxurious Motifs 3D embossing folder from Altenew. I love the almost whimsical vibe that the embossed pattern brings to this card, so I’m happy to have used it! Yay me for using 3D embossing folders more!! I mentioned a few months back that they tend to intimidate me, but the more I use them, the more comfortable I’ve been getting.
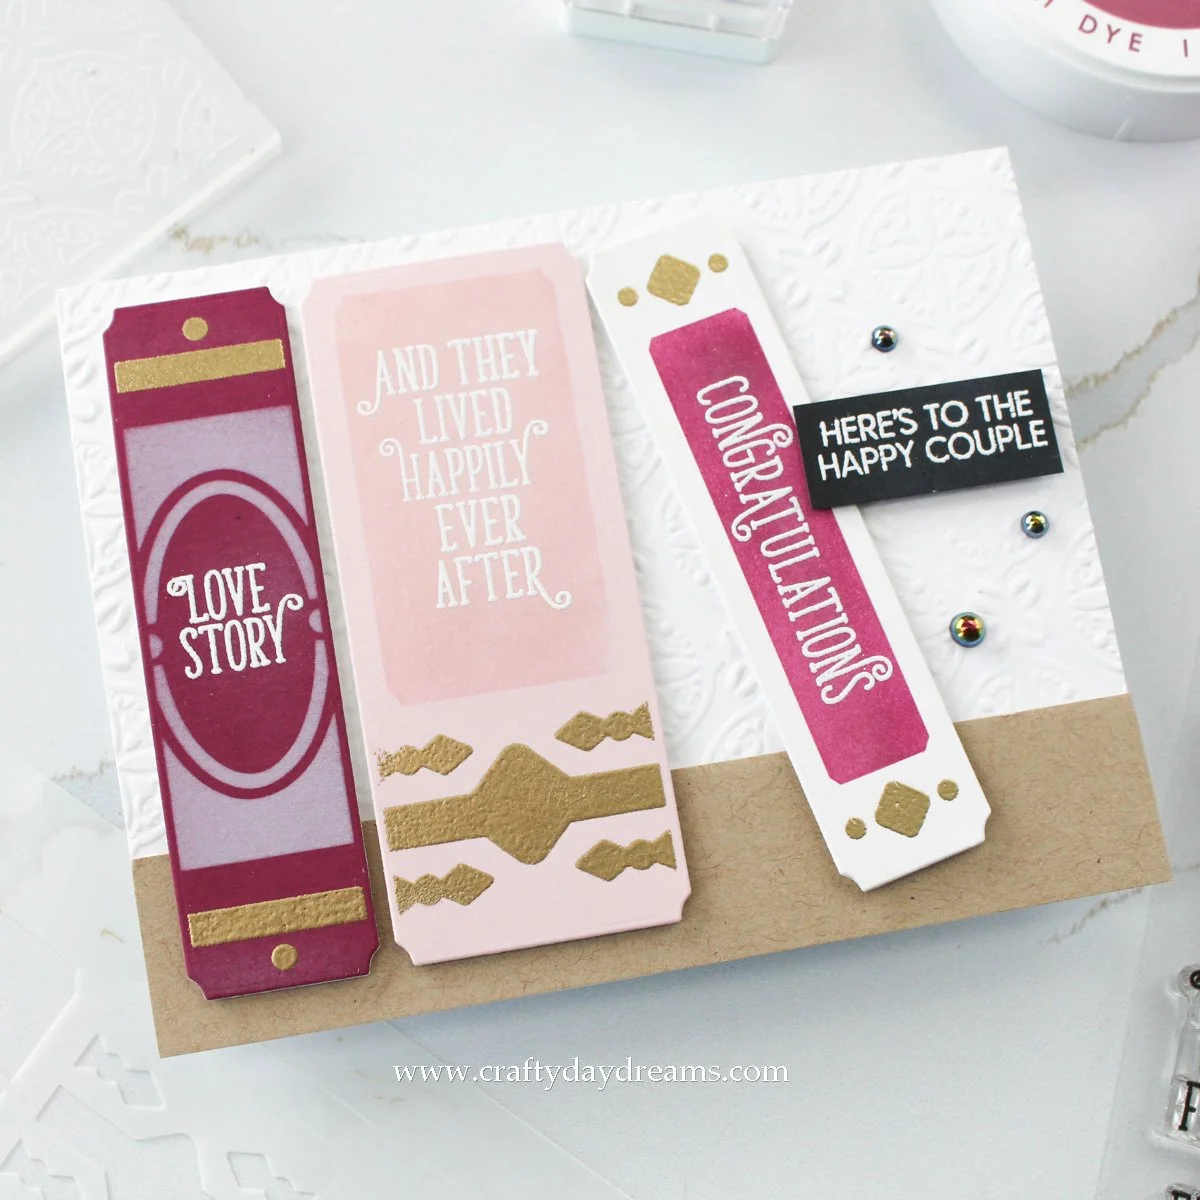
Anyway, I spritzed my C9 white cardstock that I cut down to A2-size lightly with water, then ran it thru my Platinum 6 using the recommended sandwich. I used a permanent tape roller adhesive on the back of the panel and stuck it on a pre-cut and scored Hero Arts notecard. I could used glue, but I felt the tape roller would have a stronger grip with all that texture. I glued the Wheat strip of paper on the bottom of the card, then added an extra die cut behind each of the books for some extra stability. I popped thin foam squares on the back of the books, then stuck them down, leaving the ‘congratulations’ one at a slight angle as if it was propped up against the other two. For the sentiment, I pulled out the Happy Anniversary Duo stamp set, and white heat embossed ‘here’s to the happy couple’ on black cardstock. I cut the sentiment down, then popped it up on thick foam squares so that it sat higher than the book it was resting over. To finish the card off, I thought a little bit of sparkle was needed, so I pulled out some black pearls (actually from a mix that’s no longer available called Ghostly Parade from Lucy’s Cards) and arranged three of them around my sentiment. I’m not sure if this is the ‘best’ arrangement, but it was the best I could come up with!
That wraps up these two cards! I hope you liked them!! I had a lot of fun creating these, especially since I’m a huge bookworm. I really love this release from Waffle Flower, and they do have older book-themed products too, if you’re on the hunt for more! Thank you so much for stopping by the blog today, I hope to catch you next time with more inspiration! 😊
Affiliate disclaimer: all links to Waffle Flower, Altenew, Scrapbook.com, and Spellbinders products are affiliate links. These links allow me to get a commission at no extra cost to you if you use them to shop! All other links provided are links to supplies and shops I am not affiliated with and I do not get a commission from.