

Concord & 9th—Sweet Bee Bundle

Happy Friday, friends!
Today I’ve got two cards for you featuring the Sweet Bee bundle from Concord & 9th’s February release. This bundle features a stencil pack with 5 layering stencils, coordinating dies that will cut out the stenciled images (or you can you use them on cardstock), and a small stamp set with bee-themed sentiments. I really like this bundle! I feel like it gives the perfect spring vibes but can honestly be used year-round (you could even use colors that would make it feel more seasonal!).
Sweet Bee Hello Card

I love how this card turned out! This card was loosely inspired by one of Laura Bassen’s cards from the Sweet Bee Intro video on Concord & 9th’s Youtube channel. I loved how she had her greeting in matte gold with a vellum shadow, so that’s what I planned for this card.
However, before I got to that point, I first stenciled the background. I blended on Sprout ink for the smaller leaves and floral stems and used Parsley ink for the larger leaves. For the first floral stencil, I used Sorbet ink for the large florals and Sea Glass ink on the side profile ones. For the second floral stencil, I used Simon Says Stamp Heather ink on the larger flowers, Buttercup ink on the medium sized flowers, and Poppy ink on the smallest. On the floral details stencil, I used Oceanside ink on the side profile flowers in Sea Glass ink, Eggplant ink over the Heather flowers, and Stardust ink on top of the Buttercup flowers. I really wanted the flowers with layered details to have petals be a shade darker than the base color of the flower, and I love how all of these turned out! Lastly, I blended Mushroom ink on with a very heavy hand to get as dark of a flower center as possible.
This is where the Laura Bassen inspo comes in. I die cut the ‘hello’ die and shadow from the Everyday Sayings die set out of SSS matte gold cardstock for the letters, and SSS heavyweight vellum for the shadow. I added three layers of plain white cardstock under the matte gold for some dimension, then glued it on the vellum. At this point I decided to white heat emboss the ‘everything is going to bee alright’ sentiment on black cardstock, which I die cut using a Lawn Fawn sentiment banner. I trimmed the sentiment down and got to thinking about what else I wanted to do with this card before I glued anything down.
Since the die set has a super cute bee trail die that cuts little stitching marks, I decided that I was going to use that. I’m a very visual planner when it comes to card making, so first I decided to make my bees so that I could figure out where the trail marks would go. At first I thought I was only going to have two bees, but I ended up with four, and created them by stamping the striped bee body on Buttercup cardstock, die cutting it and gluing white wings on it. These bees are adorable! Since I had all my bees assembled, I placed them around where I would put my greeting, taped down the bee trail die and ran it through my die cut machine. I tried to limit rolling my whole panel through my Platinum 6 since I didn’t want to get marks from my top plate on my cardstock, so I did a little partial die cutting where I could. In the end, I did end up with some impressions on my panel, which is a little bit of a bummer, but this is handmade, not Hallmark, right?!
Once I had all my bee trails added, I glued down my sentiments and the bees. I thought about adding some sequins to this card for some extra shine, but I couldn’t find an arrangement that I liked, so I decided to leave them off.
Sweet As Can Bee Tri-fold Card
I had a lot of fun (and maybe some frustration) making this card! This was my first time making a tri-fold, and what it taught me is that I am not good at cutting paper for card bases haha! I swear I cut them straight at 4.25, but when I scored and folded them, they weren’t perfectly even on the sides—the bane of my existence on this one! So, if you can cut and score paper for card bases like a pro (or better yet, have pre-cut/scored ones), you’ve got this!
I had a couple pieces of inspiration for this card: first off, I was making it with my Grandma in mind, and she loves purple flowers! The true inspiration for this card came from Colleen Beamish (@humorbean_cards on IG! Give her a follow!) who is one of the guest designers for Concord & 9th this month. She had made a tri-fold card this week and it blew my mind! I decided I wanted to give it a go, and before getting too crazy with my crafting, I searched YouTube and found a Jennifer McGuire tutorial on tri-folds. After following along with her steps for a top folding tri-fold (which I adjusted slightly since my front panel is too dark to write on in the inside), it boils down to having two top folding card bases that you trim the front panel of each card base by ~1/8-inch, then you flip one card base over so the short side is now the back, and the other you rotate 180 degrees so that the short side is facing up. These trimmed edges are essential to making a trifold— they allow the card bases to fit well together without making opening/closing difficult.
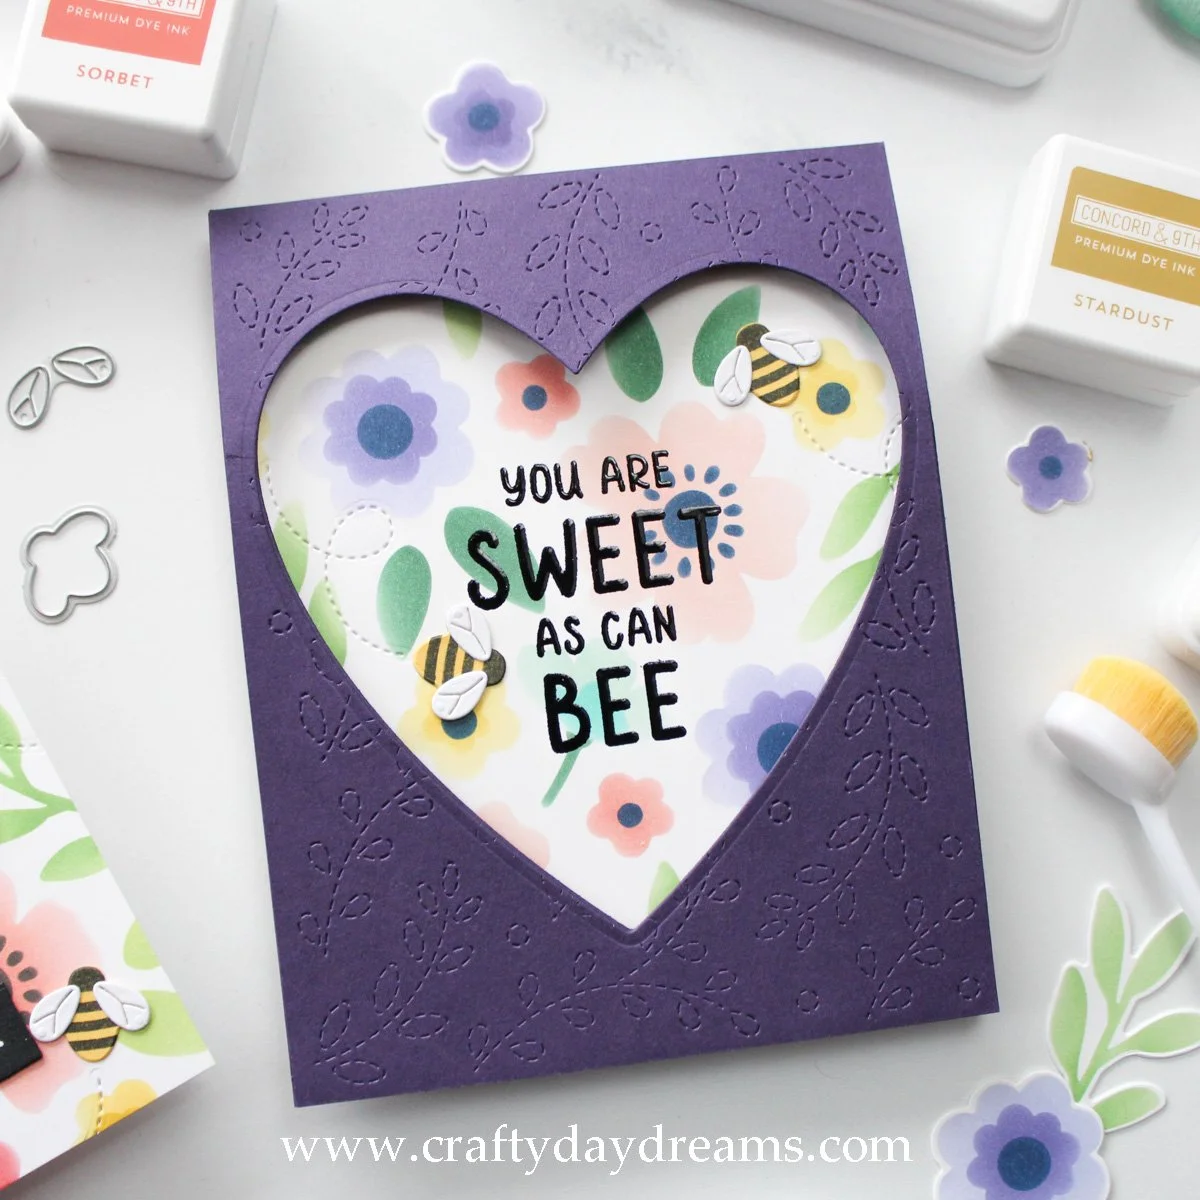
I started off by running an A2-sized piece of Eggplant cardstock through my Platinum 6 with the Stitched Vines card front die from Concord & 9th. I decided to use this since it would tie well into the stenciled florals but would also add a nice texture so the card front wouldn’t be too plain (this is just my preference, you could leave this as smooth cardstock!). I used the stitched heart die from the Triple Step Heart die set and die cut it at a place on the Eggplant panel where I liked the look of it (I had originally planned to glue this on a stenciled panel but decided against). At this point I decided I wanted to make my card base purple since this card would be going to my Grandma, so I cut an 8.5 x 11-inch piece of Eggplant cardstock down to 4.25 x 11-inches and scored it at 5.5. Since I die cut the A2-sized piece of Eggplant cardstock to make a window, I had to do the same with the card base. I lined up my A2-sized piece with the edges of the front of the card base, lined the die up with the already cut panel and traced parts of the inside of the die to make lining it up easier. I removed the A2-sized piece, lined up the die, then ran it through my die cut machine. This trick (taught to me by Jennifer McGuire) got the heart in the right position, so I was able to glue my A2-sized piece of Eggplant cardstock over my card base with no issues.

I left the Eggplant card base alone and stenciled my floral panel. I followed mostly the same colors as the last card, but this time I used Evergreen ink for the small leaves and stems, Grapefruit ink for the large flowers, and Sorbet ink for the smallest flowers, and a heavy hand with Midnight as the flower centers. This panel came out just a little different from the last one, but I’m not sure which I like more! While waiting for the stenciling to dry a little, I worked on my card base for it. I followed the same steps as above and cut down and scored a piece of 120 lb white cardstock. I really like that this card is top folding since that’ll make writing a nice lengthy message for my grandma super easy to do!
Once the stenciling had dried, I was ready to heat emboss the sentiment ‘you are sweet as can bee’ on the stenciled panel, but I wanted it to show through the heart window. So I lined up the Eggplant card base with the stenciling to figure out the right placement. When doing so, I decided adding a couple bees and bee trails would make this card perfect, so I followed the steps of the last card and added the die cut trails before adding my sentiment. I popped the stenciled panel back into my MISTI then black heat embossed the sentiment with SSS Ultra Fine Black embossing powder. After embossing, I glued down the two bees and the stenciled panel on the shorter side of the white card base.
Now comes the assembly! If I followed Jennifer McGuire’s tutorial, the order of the card should be: Eggplant heart panel, stenciled flower panel, Eggplant solid panel, and the final white panel (the back of the white card base) would be the back of the card. Since I wouldn’t be able to write on the Eggplant panel and I didn’t feel like gluing a white piece of paper on top of it to write on, I made it the back of my card. I glued the backside of the white card base to the inside of the Eggplant card base—this gives me a large space to write on!
I hope my explanation here wasn’t too confusing, but if it is, head on over to Jennifer’s video I linked above! And to be honest, having such large heart window (even with some reinforcing) does make the front of the card a bit weak, so if you want to recreate this, maybe try out a smaller heart die!
I hope you liked these cards! I had a lot of fun making them, and I can’t wait to get that tri-fold out to my Grandma. I hope you have a wonderful weekend, and I hope to catch you next time with more inspiration! 😊