

Spellbinders—Sweet & Savory Thank You Card Set

Hi, Crafters!
So sorry for being MIA on the blog last week, I’ve been making this set of cards and maybe putting a little too much detail into them haha! But, I’m finally done and so excited to share them with you! I had picked up the Sweet & Savory die and stamp set from Spellbinders last summer to go with the Food Truck large die of the month. I ended up only making one card with them and shoved in a bin for later use. I finally got around to playing with this set again, and I’m so happy I did! These cards are so cute, and with the help of the Stationary Box die from The Greetery, I made a nice boxed set of food pun thank you cards. I bought the box die set late last summer as well with the intention of making sets of cards as Christmas gifts, but I hadn’t gotten around to it.
Lately I’ve been trying to be on more of a no-buy (truthfully I’m saving up for the new Concord & 9th cardstock/ink colors and trying to spend when I know products would thouroughly be used), and I’ve been wanting to get more use out of my stash since I have a lot of products that I don’t think I’ve used enough. So, with that in mind, a lot of the products I used today are all things I’ve found in my stash, and I’m sure you could raid your stash and come up with great things too!
Pretzel Card

This was the first card I made in this set, and the one that made me realized I probably wouldn’t get all four up in time for a blog post last week. I started this card off by die cutting the pretzel die out of Wheat cardstock from Concord & 9th. This is the only brown cardstock that I have, so I decided to ink blend on it to add a little more color using the coordinating ink. Once I had enough pretzels to make a background, I decided my to use Stardust cardstock as the background panel with some added texture from the Double Stripe card front die. I chose to use Stardust because it made me think of mustard and how people will sometimes eat hot pretzels with mustard, so because of that, I decided to make my greeting red to play on ketchup and mustard.
I die cut the ‘thanks’ block letter die from the All the Thanks die set from Concord & 9th out of Poppy cardstock and one layer of plain white cardstock. I white heat embossed on black cardstock, the sub-sentiment ‘I can knot thank you enough’ and die cut it using a sentiment banner from a different Concord & 9th die set, but any you have should work!
With all my elements ready to be assembled, I lined them all up to figure out the placement I would like. At this time, I decided to cut down a strip of plain white cardstock to 4.25 x 1.5 -inches to put my sentiment on. I placed the pretzels around the sentiment in a random order and with some ‘bounce’ so that it seemed like the pretzels were being shaken out of a bag. I glued the pretzels down, then popped the greeting strip up on some thin foams squares from Simon Says Stamp. I wanted to keep the dimension minimal on these cards so I wouldn’t have issues fitting them all in the stationary box. Then as a final touch, I decided to die cut a bunch of pretzels out of plain white cardstock and inlay the salt crystals on the Wheat colored pretzels (this took a bit of time 😅).
Donut Card

I had so much fun with this card! I think it’s my favorite of the bunch, and I couldn’t be happier with it. This card was a little bit more of a struggle at first with nailing down a color palette (I knew I wanted that traditional pink sprinkled donut), so after a LOT of trial and error, I settled on a color palette of Ballet Slipper, white, brown, and Sea Glass—very Neapolitan ice cream + mint chocolate chip vibes.
One thing I did that made my life a little more difficult with this card was that I die cut the donut base out of C9 white cardstock and ink blended on Latte ink from Simon Says Stamp to get a more golden looking donut. This took a bit of time, but I do think it was worth it! The frosting layers were die cut out of Ballet Slipper, Sea Glass, white (C9), and a mid-tone brown I found in a random value pack of cardstock in my stash. On the Ballet Slipper icing pieces, I lightly ink blended on Honeysuckle ink to the inside ring and the outside edges to give the frosting some dimension. I repeated this with Sea Glass ink on the Sea Glass cardstock, Dove ink (very lightly) on the C9 white cardstock, and Simon Says Stamp Mocha ink on the brown cardstock. These little details take time, but make things look so good!
Another time intensive task was adding the sprinkles to the frosting. I die cut the sprinkles die out of Ballet Slipper, Honeysuckle, Sea Glass, white, and the same mid-tone brown, as well as a darker one that I found. I decided to switch up the sprinkles on each color of donut, so the pink ones got sprinkles in every color, the Sea Glass one got browns and white, the chocolate donuts got white, Honeysuckle, Ballet Slipper and Sea Glass, while the white donuts got Ballet Slipper, Honeysuckle and Sea Glass sprinkles. I thought this added another fun touch to the card.
By this time, I knew I wanted the card front the be white, but I wanted texture on it. So, I pulled out the Snowfall card front die from Concord & 9th, and I really like what this brings to the card! With the color palette and this texture, it feels a little vintage and reminds me of an ice cream shop.
Now for the sentiment, since the sub-sentiment I was planning on using had ‘thank you’ in it, I decided again to use a ‘thanks’ as my sentiment. I pulled out the All the Thanks stamp set from Concord & 9th and stamped the hexagon one in Ballet Slipper ink on plain white cardstock and die cut it with the coordinating die. This wasn’t large enough to stand out, so I decided to die cut the elongated hexagon from the same die set out of plain white cardstock and glue it behind the sentiment, but I still needed something more. Since I only had one Sea Glass donut, I decided to cut a strip of cardstock similar to the last card, but this time at 4.25 x 1.25 -inches. I wanted to add some texture to the Sea Glass piece, so I pulled out the Elegant Eggs stamp set from Ellen Hutson and stamped the speckle stamp on each end of the Sea Glass strip. I LOVE what this adds to the card.
For the sub-sentiment, I white heat embossed ‘I donut know how to thank you’ on the same mid-tone brown cardstock as the donut, and cut it out with a stitched banner die from a Concord & 9th die set. I love how the sentiment as a whole pulls from all the colors of the card, and I think that adds a nice cohesive feel. I placed the donuts in a random pattern while trying to not make them feel too repetitive or liner, then glued them down. I popped the Sea Glass strip up on thin foam squares from Simon Says Stamp, then glued the hexagon sentiment down. Since the sub-sentiment was straddling the Sea Glass strip, I trimmed a foam square in half and added it the bottom edge of it to add some support. This card was by far the most detailed out of all four, so it’s all downhill from here!
Hot Dog Card

This card gave me the most trouble when it came to the layout, and quite frankly (no pun intended) made me tempted to only make two cards instead of four for this set. For some reason coming up with this layout was more challenging to me, but I’m happy with how this card turned out!
Since I liked the softer brown on the donuts, I decided to do the same with the hot dog buns by die cutting them out of C9 white cardstock and ink blending on SSS Latte ink. Originally, I had planned on six hot dogs on this card in some way, but after playing around with the hot dogs and buns, I decided I wanted each hot dog to have two bun pieces instead of one, like in the examples of this die set. With this in mind, I ended up sticking to three hot dogs instead. For the hot dog, I die cut it out of Marmalade cardstock from Concord & 9th, and ink blended over it in Pumpkin ink from Hero Arts to really darken it up and get it more true to color. I die cut the ketchup and mustard out of Poppy and Buttercup cardstocks, and used the ramen topping die to die cut plain white cardstock to make onions, and Parsley cardstock to make relish.
I wanted each hot dog to look a little different from each other, so the one at the top has just mustard, the one on the lower left has ketchup, mustard, and onions, and the lower right hot dog is loaded with ketchup, mustard, and relish.
With the hot dogs ready, I started working on the background and sentiment. Since the other two cards had a textured background, I continued that here by using the Quilted card front die on Peacock cardstock. I love how the Peacock helps the hot dogs to pop off the background a bit (which is partly due to it being a complimentary color to the hot dog). I thought about adding ketchup and mustard squiggles and relish clusters to the background, but held off until I figured out my sentiment.
The sub-sentiment I chose to go with for the card was ‘frankly, you’re the best’, and I white heat embossed it on Parsley cardstock. Since there is no mention of thanks/thank you in the sub-sentiment, I decided to go with ‘thank you’ as the sentiment from the So Very Nice stamp set from The Stamp Market. I didn’t want the whole sentiment to be Parsley ink, so I inked it up with Sprout ink for the ‘thank’, stamped it and didn’t clean the stamp off, then inked up the ‘you’ and naturally a little overlap happened on the bottom of the ‘thank’. I love how this looks! Since I just made two cards with rectangular sentiments, I wanted to do something different for this card. I pulled out my Nesting Circles dies from SSS and die cut out the sentiment. Since it felt a little lacking, I die cut the largest circle from the Essentials Blanket Stitched Circle die set from Pinkfresh Studio. I love the texture this adds and how it kinda looks like a paper plate—it brings in some backyard BBQ vibes! I popped the sentiment up on thin foam squares again, and stuck it down.
After a bit of fussing, I found an arrangement for the hot dogs that I really liked, and once they were glued down, I added the ketchup and mustard squiggles and the bits of relish. I think these added a great finishing touch and filled in the gaps well! Besides being a good punny thank you card, I think this card would work really well for Father’s Day too!
Pizza Card

All right, we’re coming up on our last card! This one came together a bit quicker than the other three since the layout was a bit more straightforward. I started off by die cutting the pizza pieces out of Wheat cardstock for the crust, Cranberry for the sauce layer and the pepperoni, Ivory for the cheese layer, Parsley for the peppers, and Mushroom for the olives. These die cuts layer together really well and make assembly quick and easy!
With the pizzas ready, I got to work on the background. I didn’t have a card front die that I thought suited this card well, so I went into my stash and pulled out the Picnic Plaid Turnabout. This is perfect!! What feels more pizza place/Italian restaurant like than a white and red checked tablecloth? I stamped all four turns of the turnabout in Poppy ink on plain white cardstock. My ink pad is in need of re-inking, so the panel turned out a little less vibrant than it could have, but I’m happy with it! I cut the panel down to 4 x 5.25 -inches since I was planning on matting it on a white card front.
For the sentiment, I pulled out the ‘thank you’ from the Smooth Lines Mix & Match Sentiments die set from Spellbinders. I die cut two layers out of plain white cardstock and one out of SSS matte gold cardstock and glued them together. While that dried, I decided to build my sentiment on an oval for this card, so I die cut the largest oval from the Essentials Blanket Stitched Oval die set out of plain white cardstock. I wanted a mat under it, so I pulled out my Nesting Ovals die set from Waffle Flower and chose one slightly larger and die cut it out of the same SSS matte gold cardstock. I white heat embossed the ‘you can’t be topped’ sub-sentiment on C9 black cardstock and cut it out with the same sentiment strip/banner die as the first and last card. I glued the sentiment, sub-sentiment and pizza slices on the card front, trimmed off the excess and matted the panel on a white 4.25 x 5.5- inch card base.
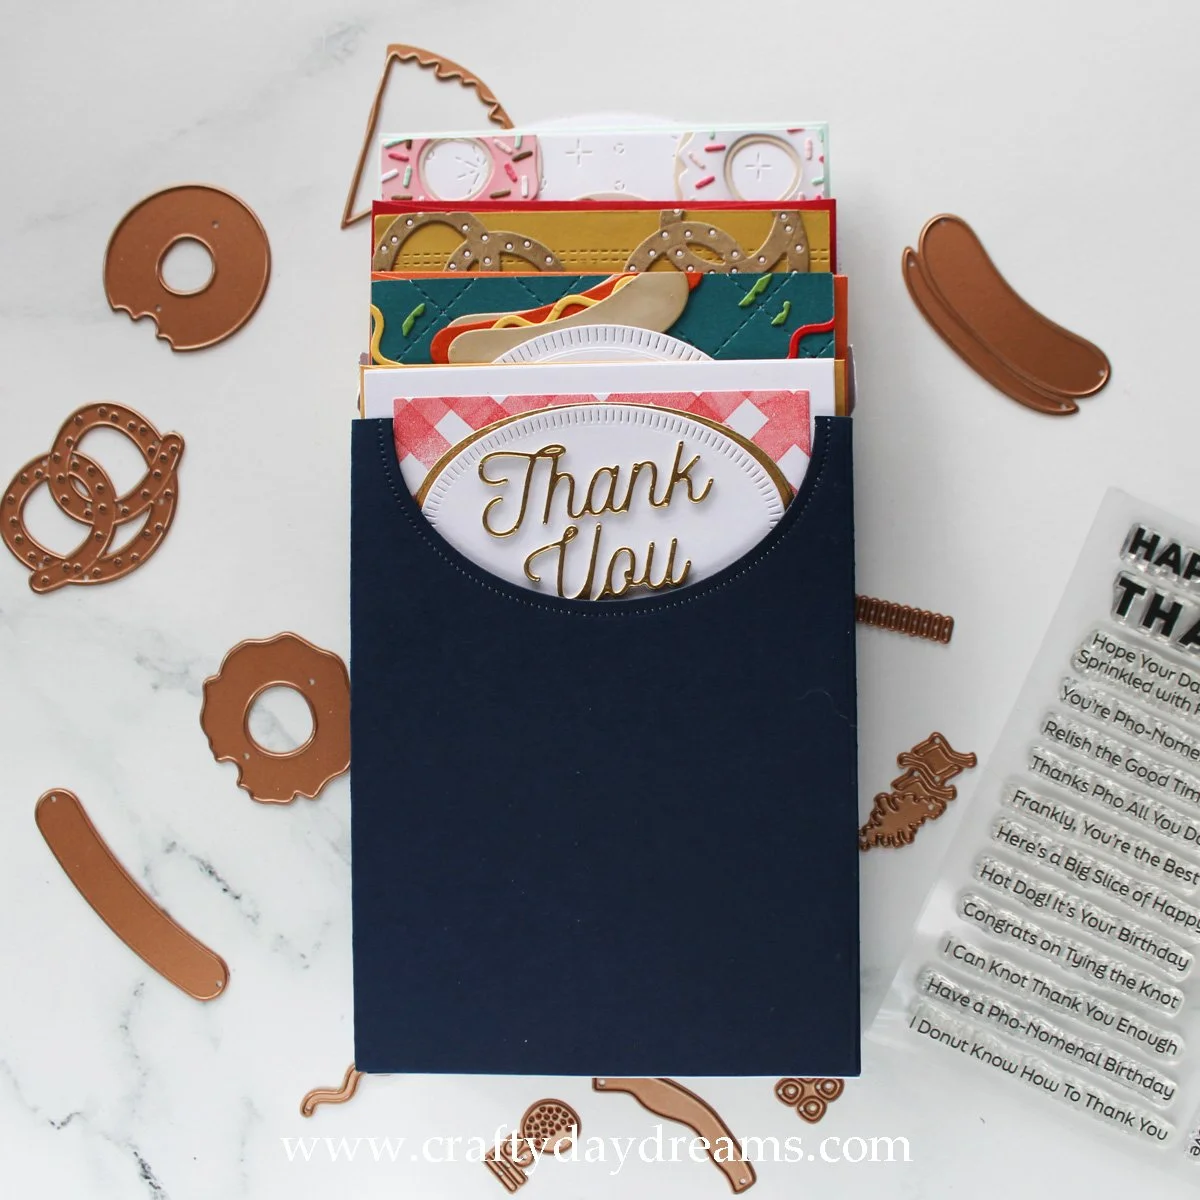
Stationary Box
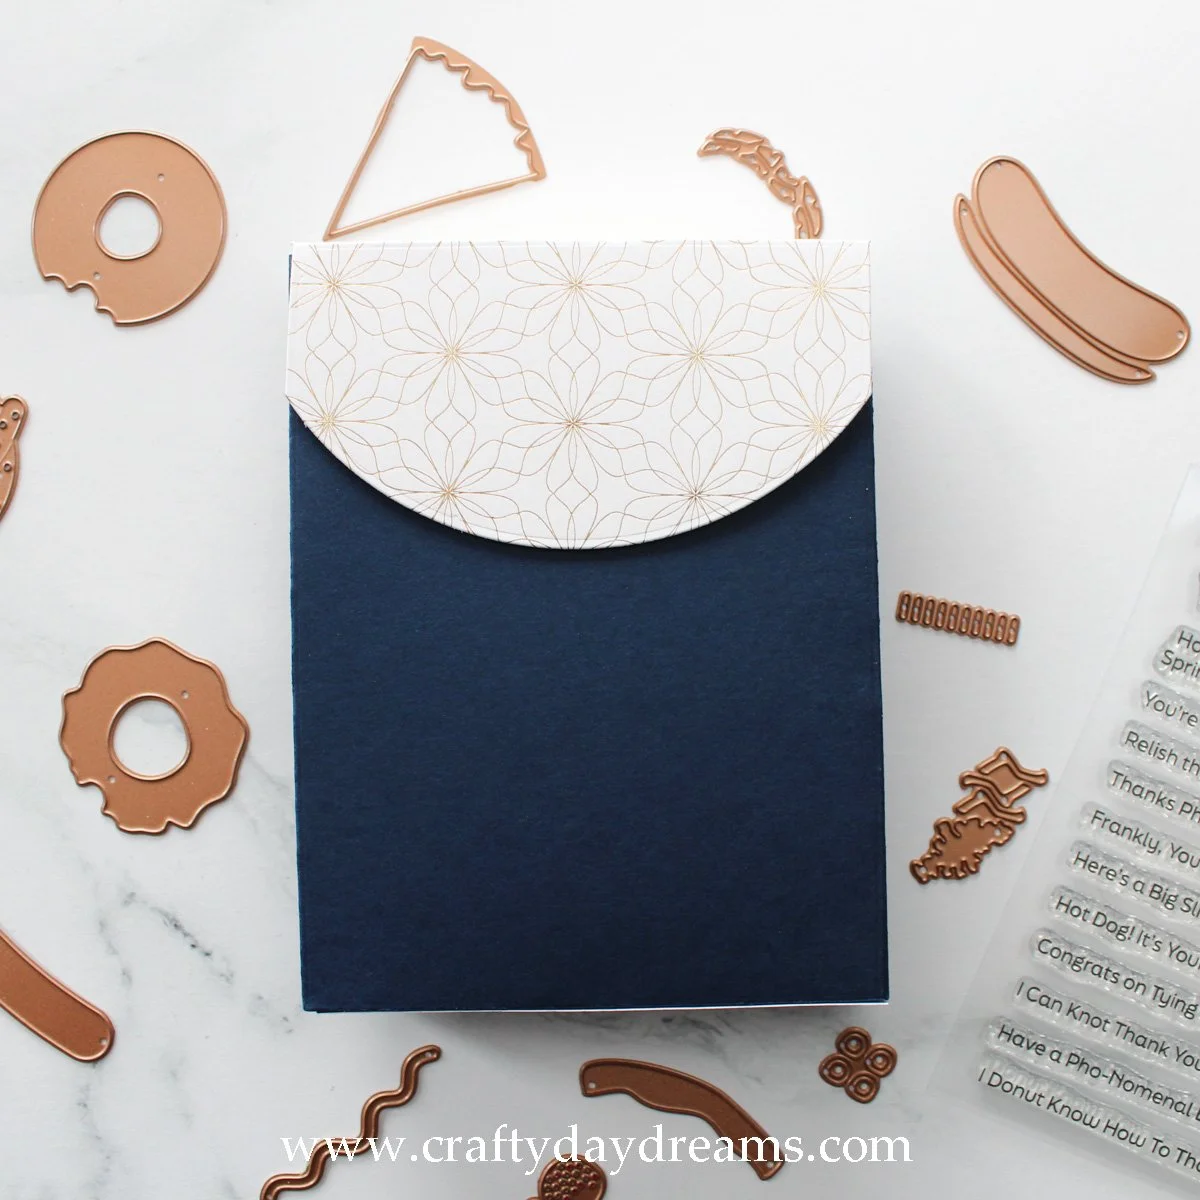
Really quickly, I wanted to walk through the stationary box. On The Greetery’s website, the product listing says that four cards and envelopes can fit into the box easily, and more can potentially fit depending on the amount of dimension on cards. The best feature of all in my opinion, is that you can seal/close this box with a magnetic closure, which makes things feel really professional and fancy. Since I kept my dimension lower thanks to low profile foam squares and layering thinner cardstocks, I think I could have fit a fifth card in this box.
To make this box, I die cut two pieces of Midnight cardstock with the die that creates the body of the box, and a piece of foiled patterned paper from a Recollections 12x12 paper pack for the box lid. I followed what Angela did in The Greetery’s intro video and added my magnet and front flap (watch her second assembly for the easiest way to put this together!). My only issue with the paper I chose is that the top flap is a little weak (the paper is not 80lbs or higher), and I had thought about reinforcing it (or cutting off the small tabs) but didn’t. This can be my prototype haha! All in all, I love this little box! I can’t wait to gift cards or maybe even sell some cards in these boxes. They really make everything look and feel professional.
So, that’s all that I’ve got for you today! I hope this post wasn’t too long winded for you, but it was a lot of content! I really enjoyed making this set of cards, and I might have to make another one soon! Thanks for stopping by the blog today, I hope to catch you next time with more inspiration! 😊