Altenew— Guest Designer of the Month for March!
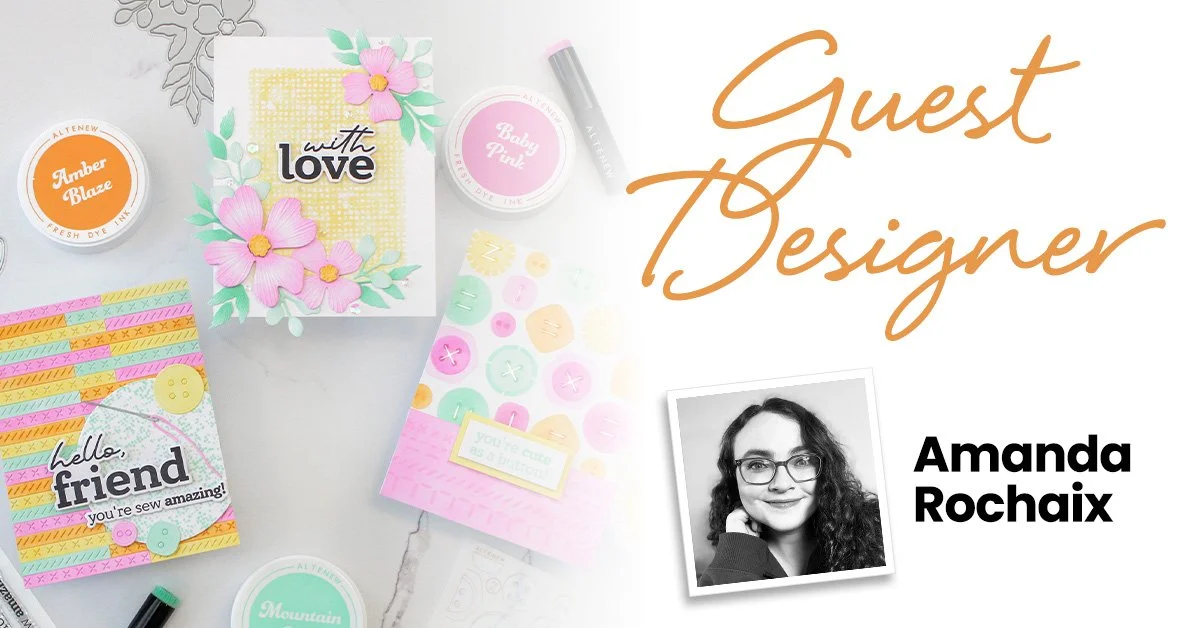
Hello, friends!
Today I’m thrilled to share that I’m Altenew’s Guest Designer for their Blog for the month of March! In case you didn’t catch my post on their blog, here it is!
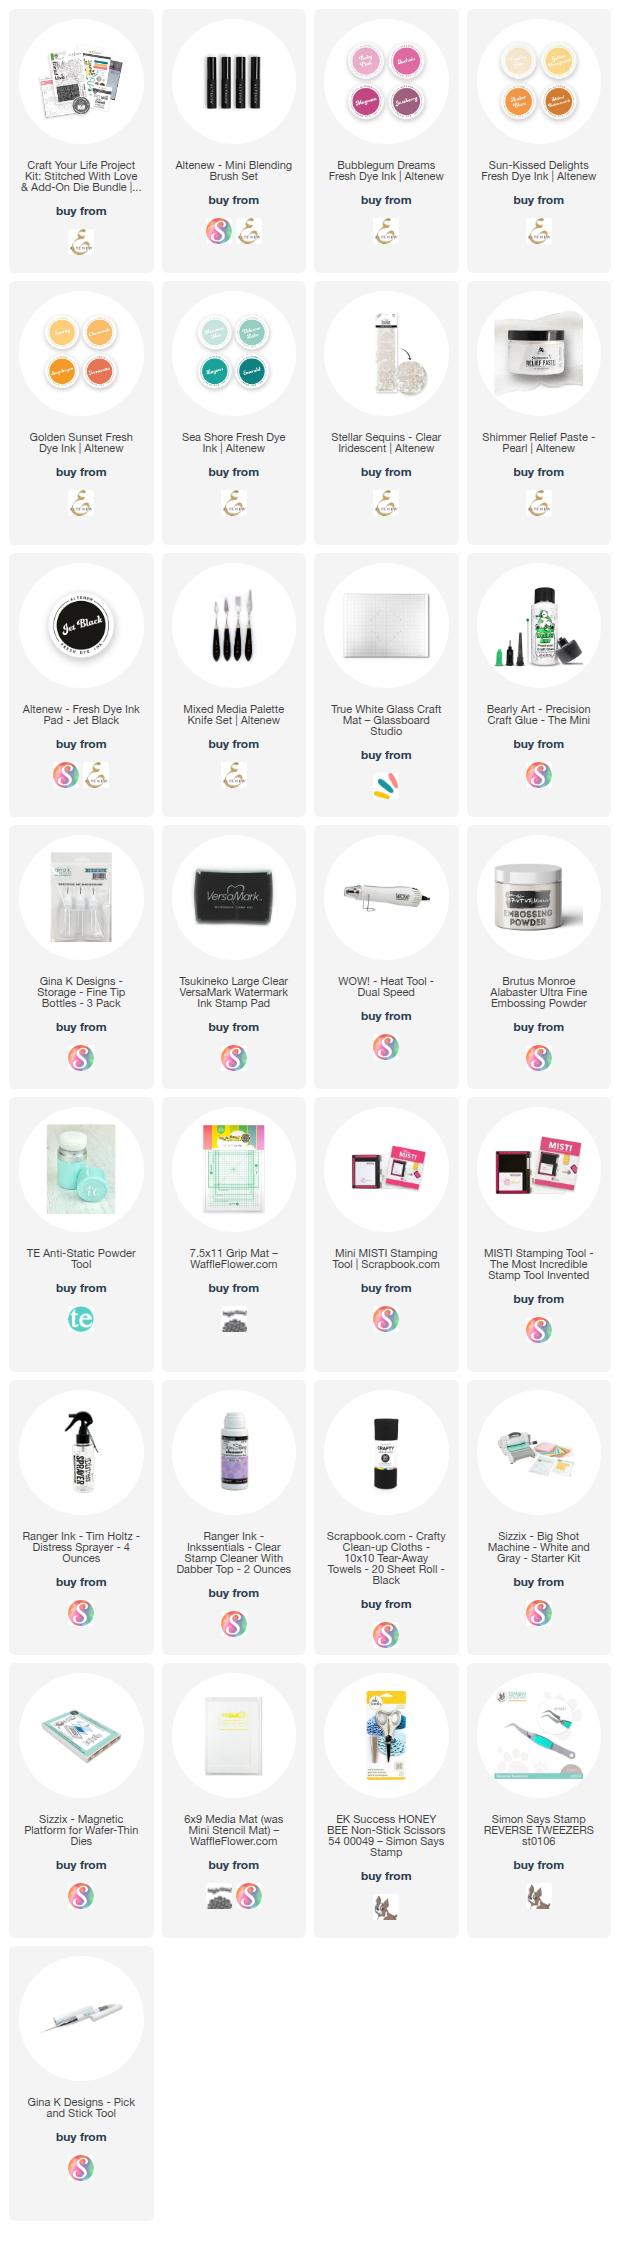
One Craft Your Life Project Kit Three Ways!
What I really wanted to highlight this month is the versatility of Altenew’s Craft Your Life Project Kits. These kits are one of my absolute favorite products from Altenew (besides Craft-A-Flower die sets 😍), and I love how many uses and creations you can get out of them. So, today I’ve got three cards for you using theStitched With Love Project Kit that have three different looks! You may notice that this collection of cards is pretty cohesive, and that would be because I’m using the same color palette on each! That’s one of my favorite things to do when creating with a kit because I feel it makes me think a bit more creatively with those colors, but it’s also just fun to do! With that said these are the products I'll be using today:
-Golden Honeycomb Fresh Dye Ink
-Stitched With Love Project Kit Add-on Die Bundle
-Stellar Sequins - Clear Iridescent
Textured Stripes
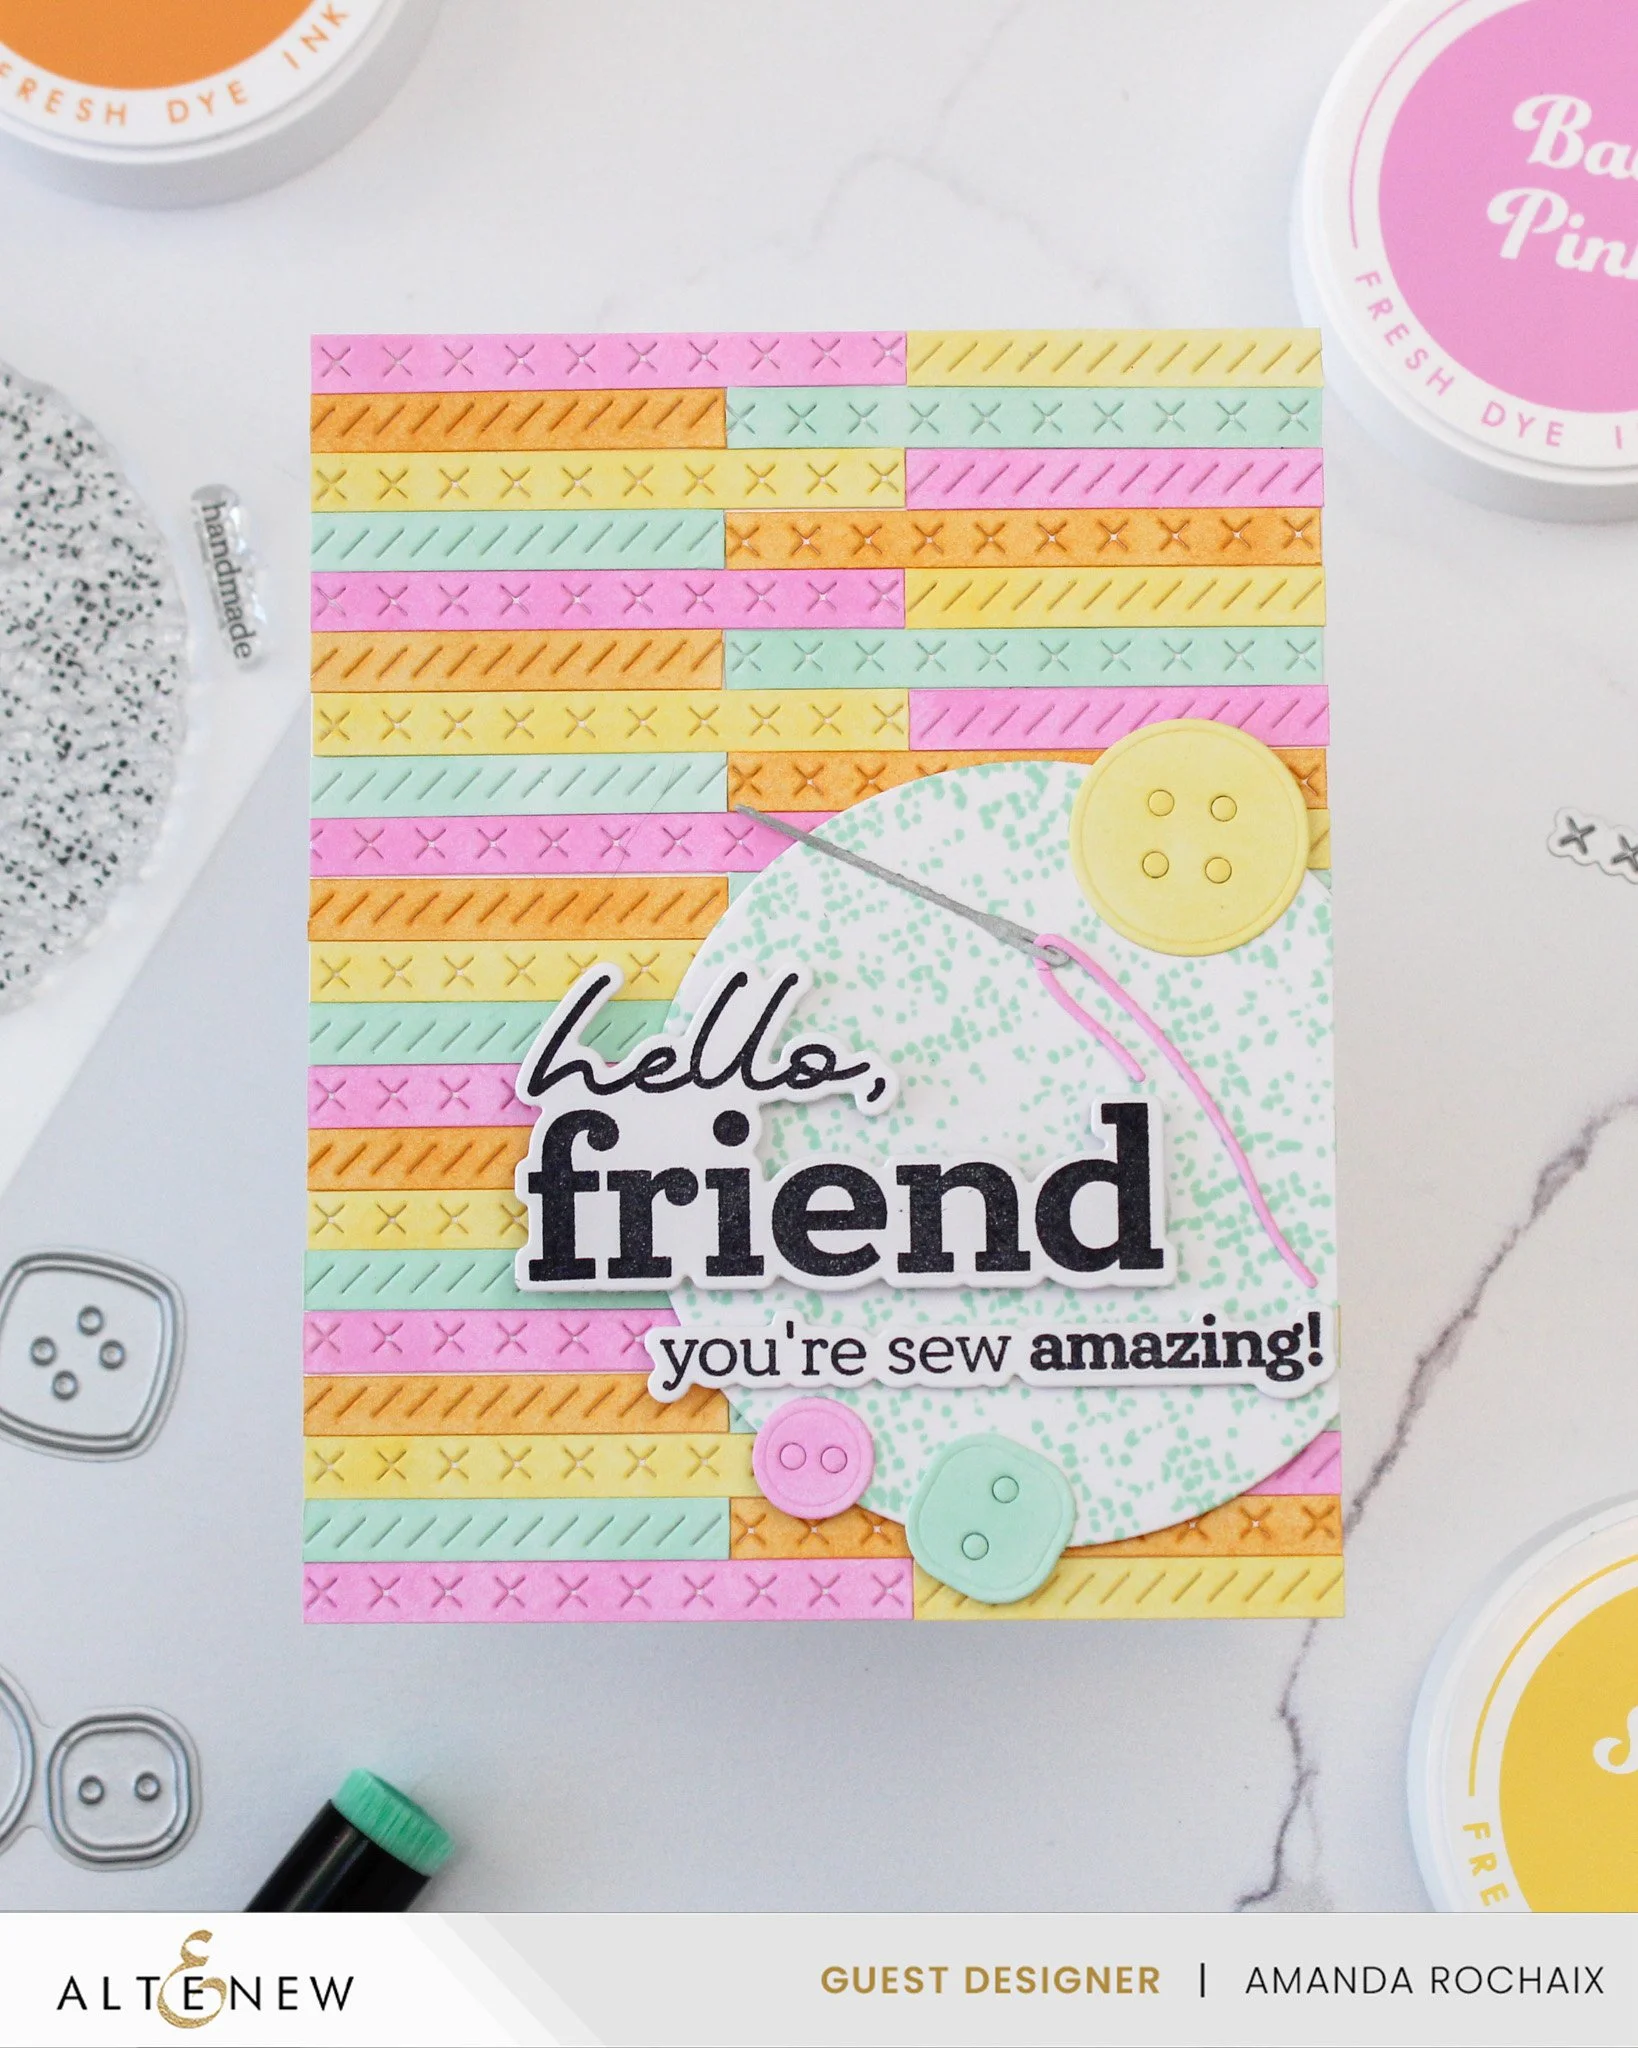
Now onto the cards! The first card I created with this kit has a gorgeous multicolored stripe background. This card is fairly simple, but it sure is tedious! I really wanted to use the small stitching texture dies in the die set, so I chose the cross and diagonal stitch dies because they were the same size. I grabbed white cardstock (use your favorite kind that you like blending on!) and cut it in 1/4-inch strips, then cut those 1/4-inch strips to lengths of 2.5 inches. I ran each strip through my die cut machine using the texture dies, then divided my pile of strips into four and started ink blending. I really loved how fun Baby Pink, Amber Blaze, Sunray, and Mountain Mist Fresh Dye Inks looked together, so I just had to use those colors!
Once all my strips were blended, I took an A2 card base and started to glue them on. I started on the bottom left with a Baby Pink cross stitched strip, then glued down a Sunray strip. Since each strip is 2.5 inches long, each row would have one strip shorter than the other. Because of this, I didn't want the short strip to be on the right side every time, so I started alternating sides and colors. This created a super fun pattern and texture! With my background completed, I wanted to have a spot to ground my sentiment on the lower right of my card front since the background is so busy. I used the large circle stamp from the Stitched With Love stamp set, stamped it in Mountain Mist ink, then die cut it using a circle die. I thought Mountain Mist would be best for the circle detail since a lot of blue in that corner would be lost when putting that circle there. I popped the circle up on some thin foam, then stuck it down so it was offset, and trimmed off the excess.
Next up was the sentiment! I stamped the 'hello, friend' and 'you're sew amazing!' sentiments in Jet Black Fresh Dye Ink and die cut them with the coordinating dies. I popped the 'hello, friend' up on a thicker foam, and since the 'you're sew amazing!' was my subsentiment, I decided to use thin foam on it so the 'hello, friend' had more of a visual impact. I felt my circle was a little too empty, so I pulled out the thread and needle die, as well as the button dies, and die cut and blended them in coordinating colors. To me, these bits are my embellishments since I thought adding sparkle to this could be a bit too visually overwhelming.
Beautiful Buttons
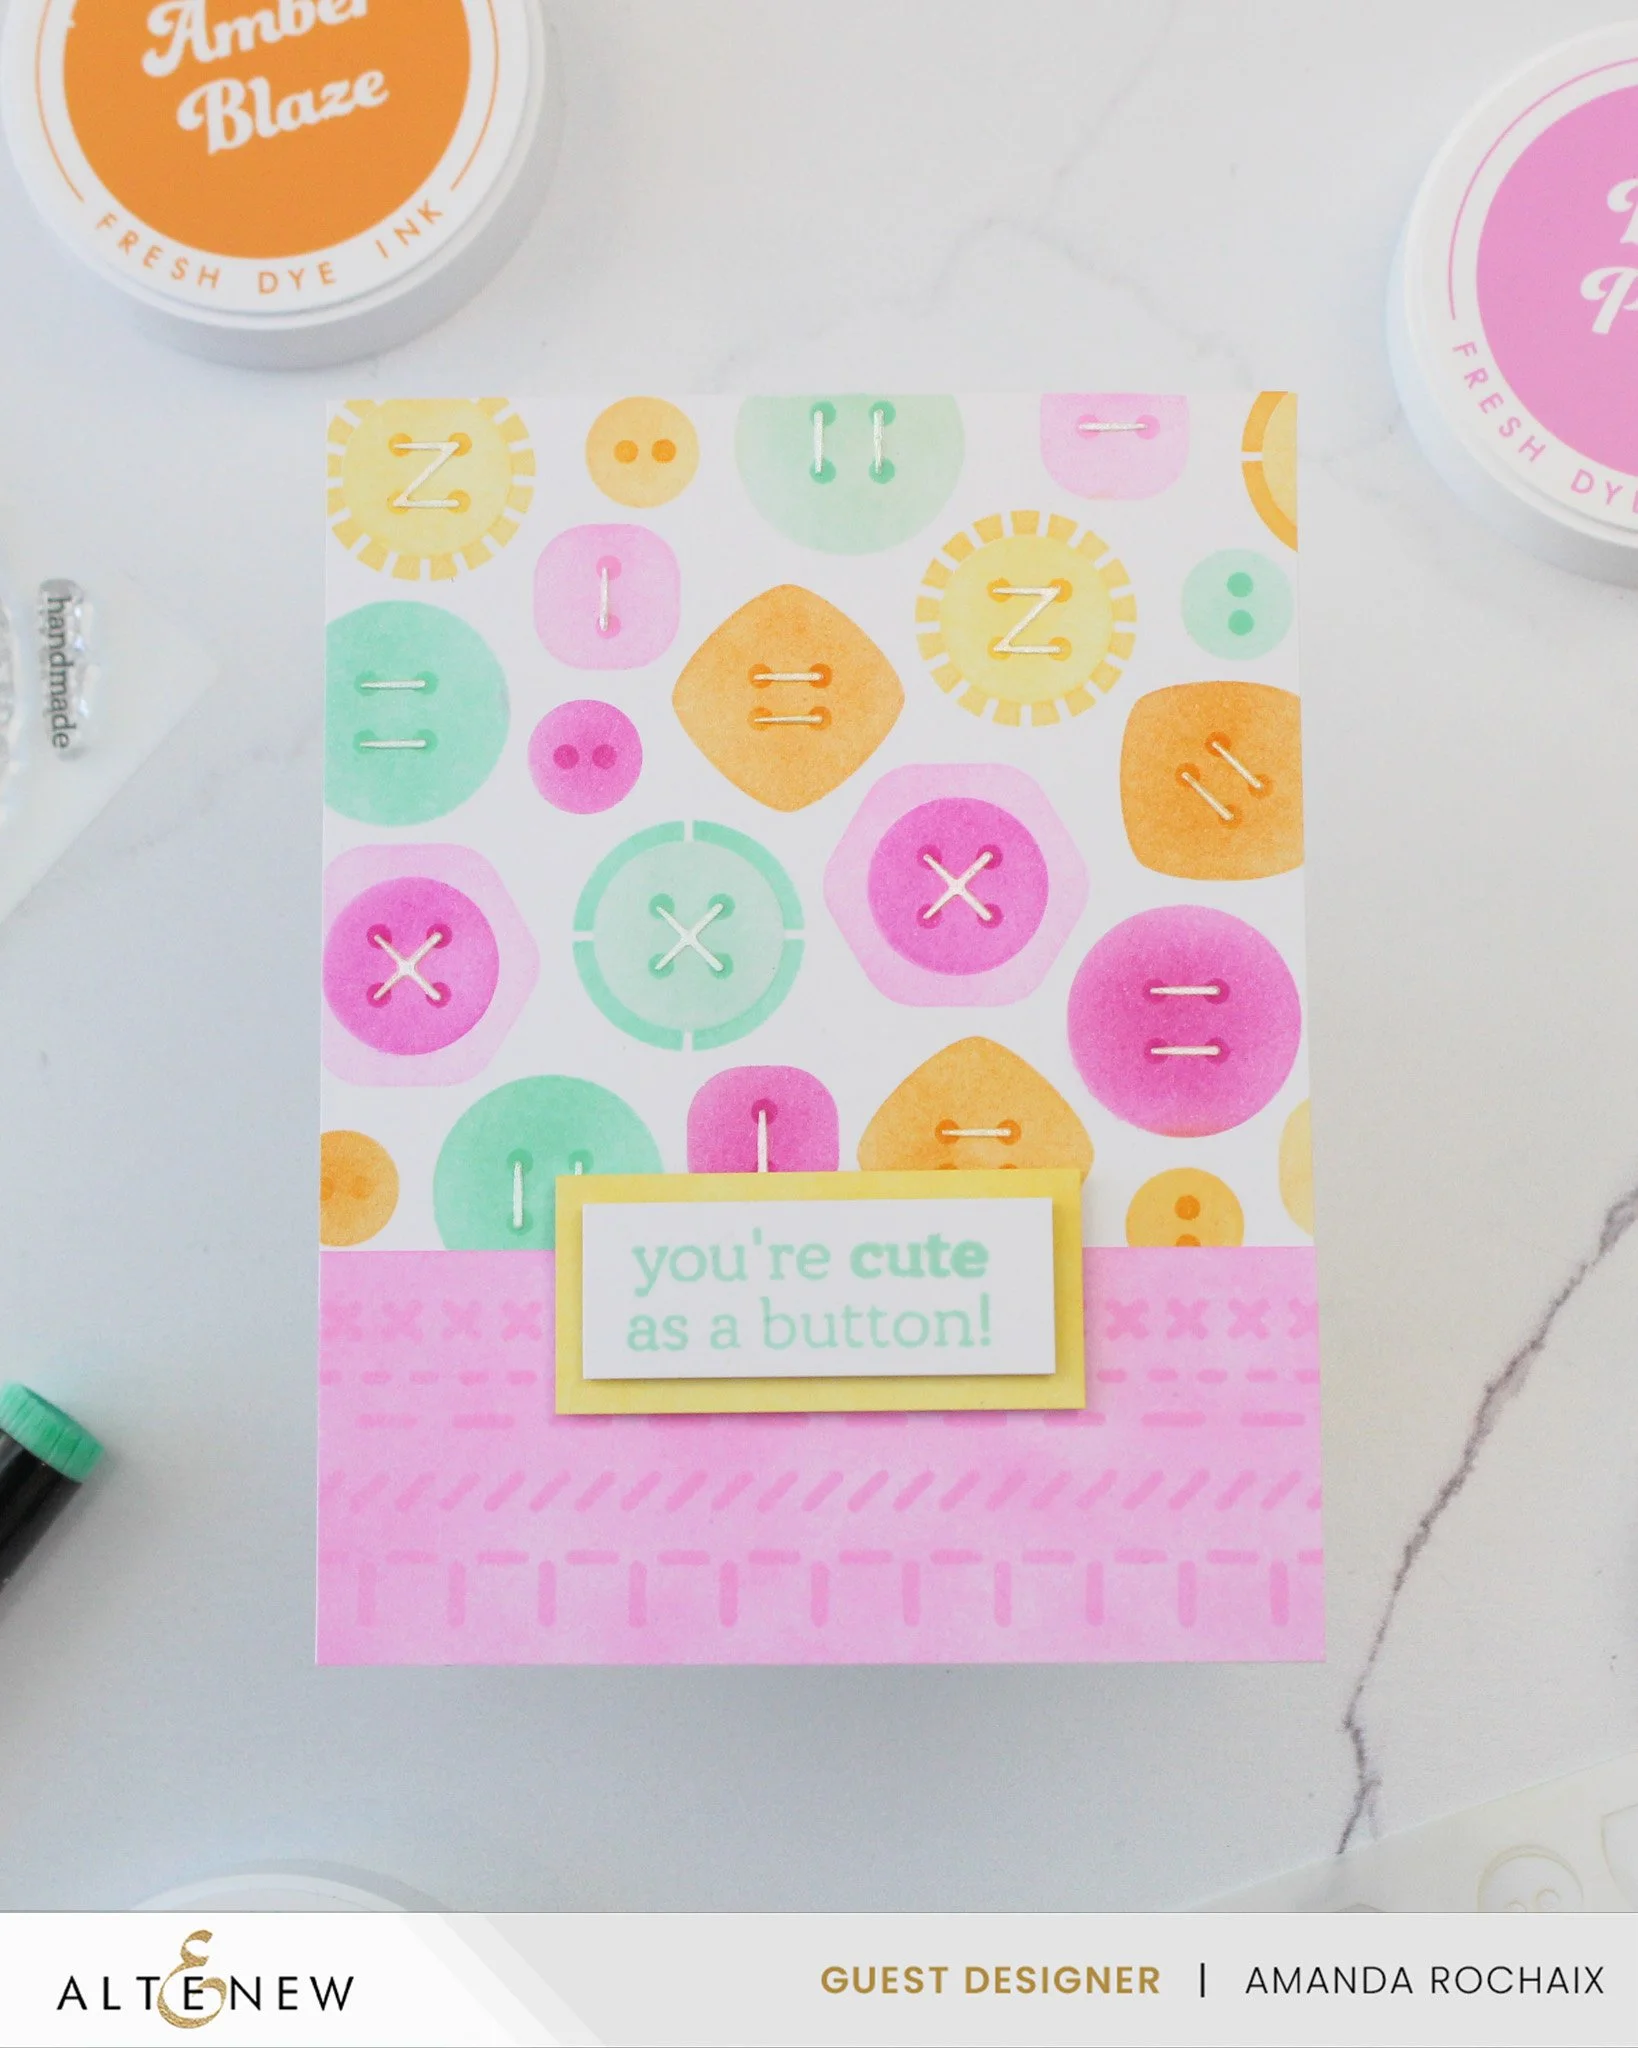
Now onto the cutest button card you've ever seen! I adore the stencil set included in this kit so much! Not only do you get an adorable button layering stencil, but you also get a great background stencil with a design that has a variety of stitches. Here is where I kind of cheated on my color palette just a little bit 🫣. Since there were so many buttons on the layering stencil, I felt I needed just a few more colors so that I could have a balanced and not to repetitive background. I ended up pulling in buddy colors for my color palette and added Fuchsia, Chamomile, Golden Honeycomb, and Volcano Lake Fresh Dye Inks. These are still in the same ink families, but they allow me a little more variety which I love!
After blending stencils 1-3, I decided I would use Pearl Shimmer Relief Paste on stencil 4 to make it look like there was white stitching. I love the subtle texture and shine that this added to my panel! At this point, I really wanted to add a bit more color to the bottom of my panel and use the included background stencil. Sometimes when I stencil on white cardstock with a busy design, I feel like my eyes can get overwhelmed by all the white space (and this is very much a me thing!). My solution to this is to bring in a strip of colored cardstock to break things up. In this case, I took some white cardstock that was 1.75-inches tall by 4.25-inches wide and blended the whole thing with Baby Pink ink. Since I wanted this piece on the bottom to not draw too much attention from the buttons, I chose not to blend Fuchsia ink over the stencil and instead went tone-on-tone with more Baby Pink. I love how soft this turned out! I glued the strip to the bottom of my button panel, then got to work on my sentiment.
At this point, I knew I was using the 'you're cute as a button!' sentiment, but I didn't want to use the coordinating die. I decided to cut two rectangles (the larger 1 x 2.25-inches, and the smaller 0.75 x 2-inches) and blend the larger one with Sunray ink, and stamp my sentiment with Mountain Mist on the smaller one. I popped the sentiment rectangle on top of the Sunray rectangle with some thin foam, then added more thin foam to the back of the Sunray rectangle and stuck it on my cardfront so it overlapped the Baby Pink area. I really like how this card turned out and how cohesive the design feels with all the colors and the sentiment placement.
Embroidered Blooms
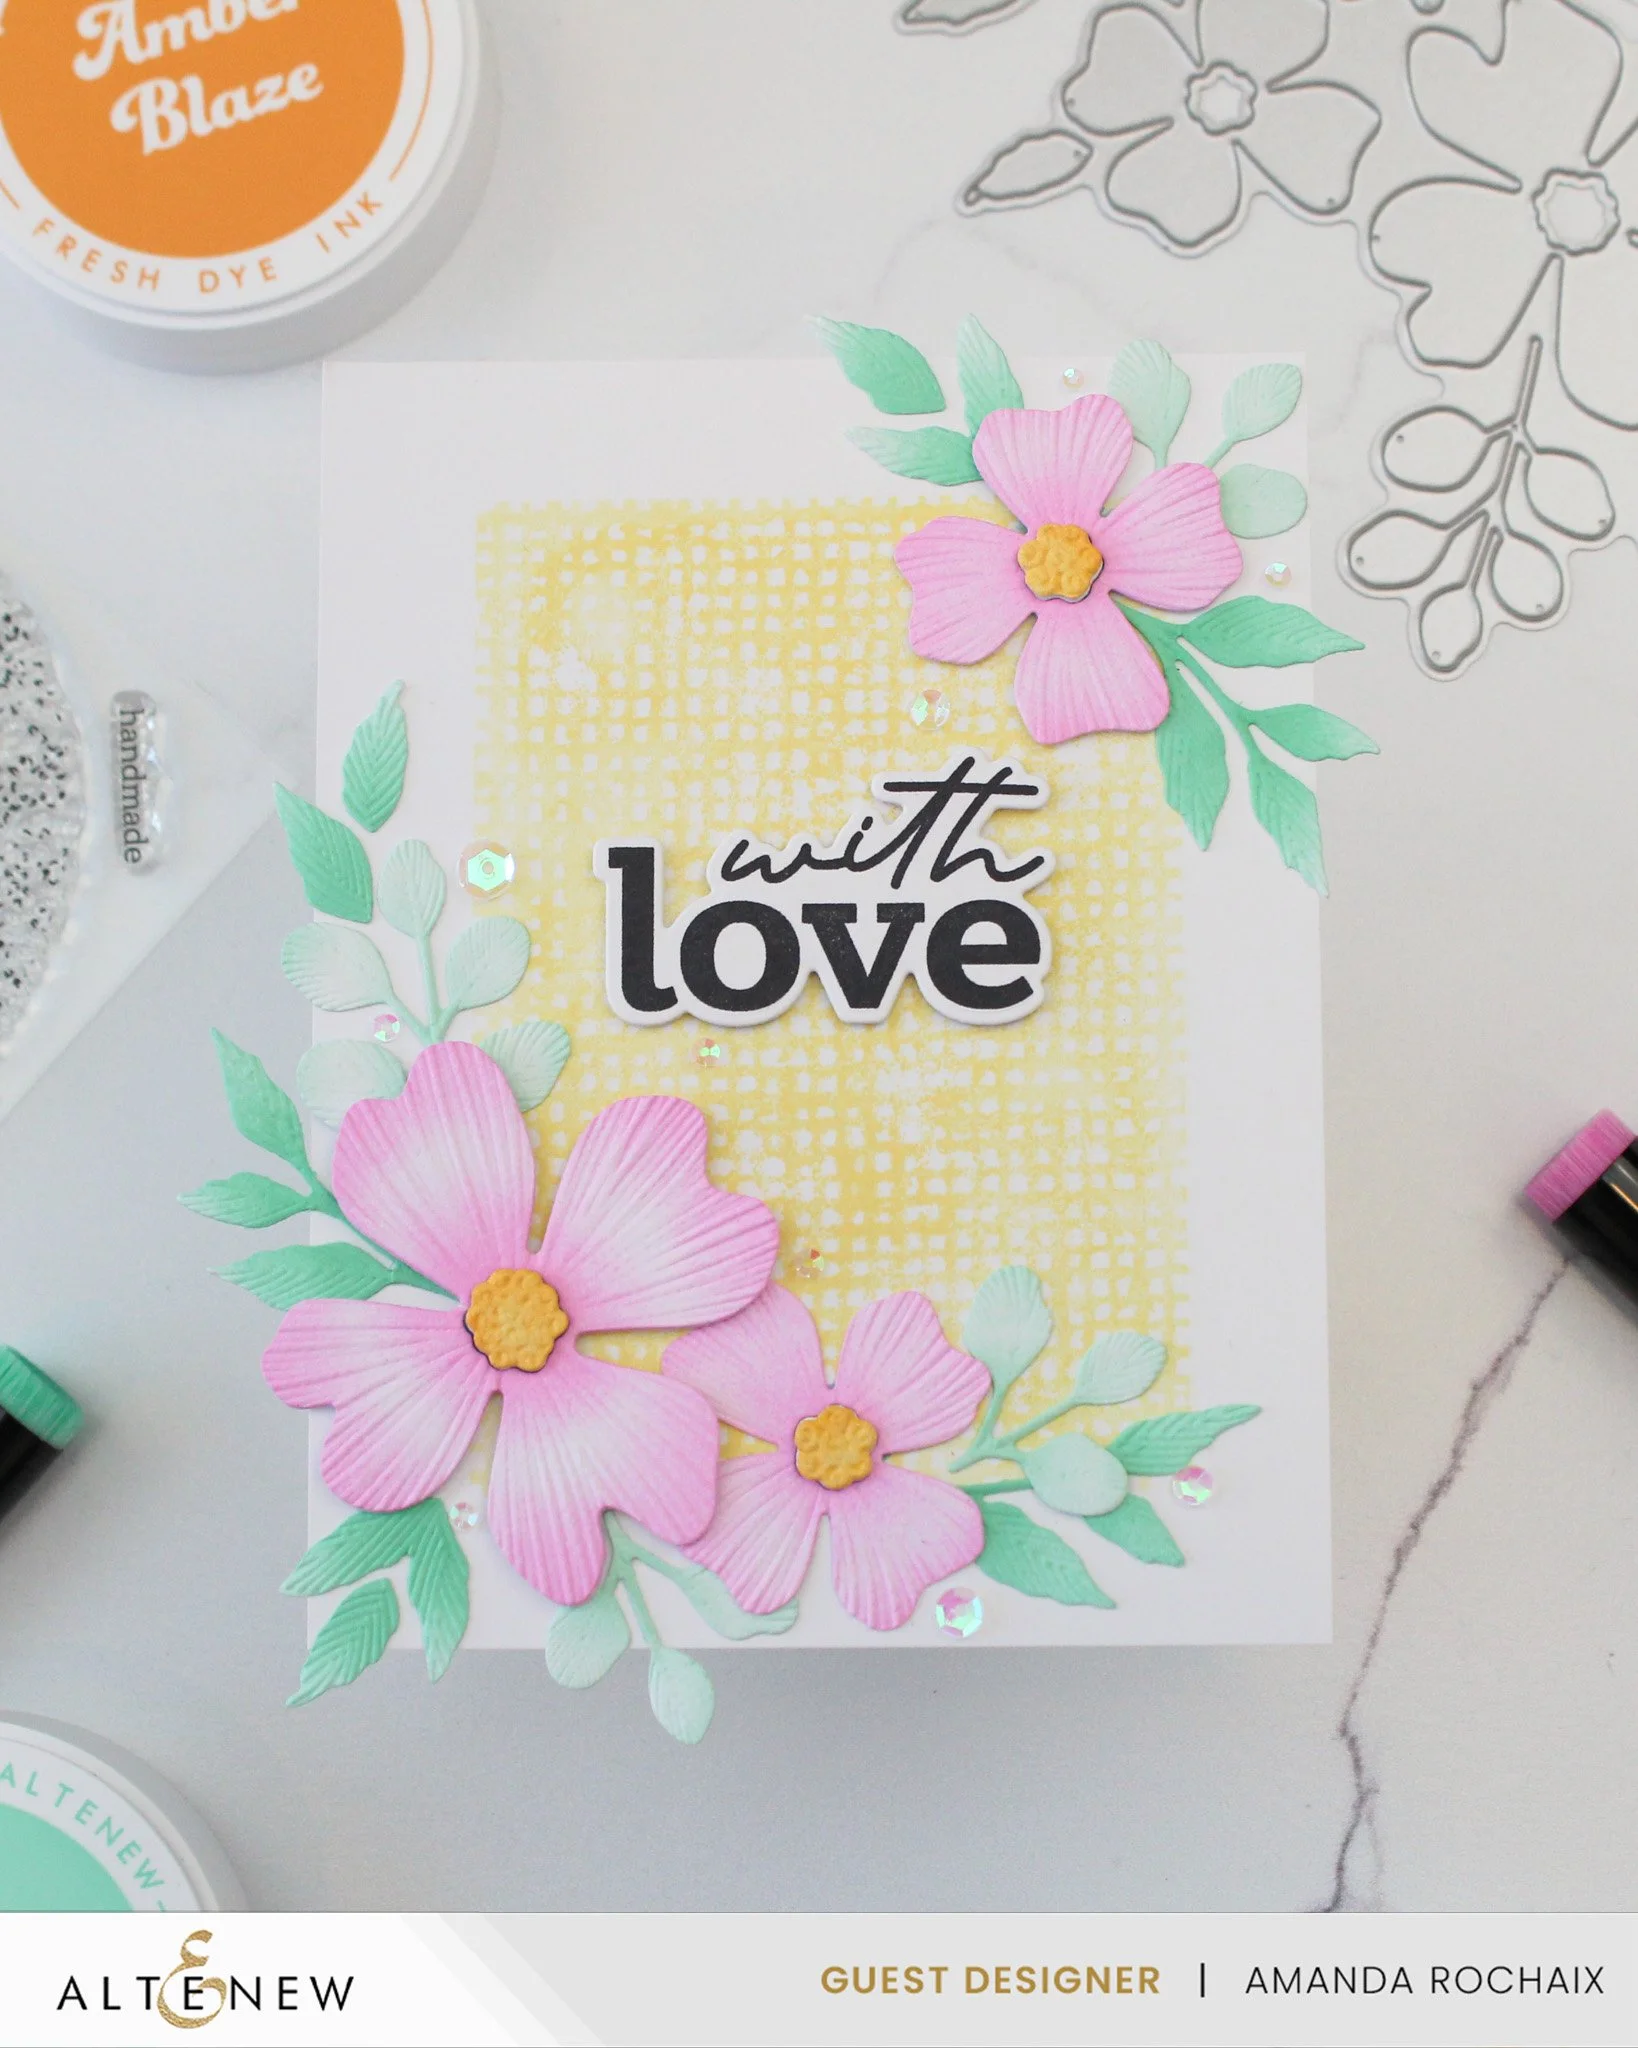
Last up is a floral beauty! I about screamed with joy when I saw that this kit's embossing folder coordinated with the floral die to add some faux embroidery texture to the flowers, so I knew I had to use it on this card! I die cut the floral swag two times out of white cardstock, then lined each element up in the embossing folder, and ran it through my die cut machine. Once all my pieces were embossed, I went back to my color palette to see what colors to use. The way that I craft, I tend to think about my background first then build up from there. I knew I wanted to use the rectangle texture stamp, and thinking over the colors I had in my palette, I decided to use Sunray for that. Since I didn't want the yellow to be too bright, I did some second generation stamping, but because I had to second generation stamp a few times since the stamp wasn't perfectly conditioned before use, the background did turn out a bit brighter. From here, deciding on the colors to use was easy! My flowers would be Baby Pink with Amber Blaze centers, and the greenery would be Mountain Mist and Volcano Lake.
When it came to ink blending, I really wanted to see some gradation, so for the leaves I really focused more color on the base of the leaves/stems, then blended lighter near the tips. For the flowers, I wanted something a little bit more dynamic, so I blended them a bit differently. First, I laid down color in the center by repeatedly swirling my mini blending brush until the color got about a third of the way down the petals. Then I added color from the bottom of the petal and blended it up about a third of the way. This left a light pink/white little section on each petal that gave the flowers a highlight, and I really love it looks!
With my flowers done and my background ready to be built on, I started arranging my flowers. I know flower arranging can be scary, but a tip I have is to make things balanced but different. The layout that I ended up going with has two pink flowers and lots of foliage on the bottom left, but on the upper right, I only have one flower and three pieces of greenery. This is different enough from the lower left that your brain wouldn't be calling it out as being too similar, but it also feels balanced because it's surrounded by just as much greenery as the lower corner on a smaller scale. Once I was happy with my arrangement, I glued down all the greenery. To add a bit of dimension, I added the flower centers to the flowers with some thin foam squares (I stuck them to a plain diecut of the flower center that I held in place with easy see tape on the back of the flower). This carries such an impact that you could glue the flowers down flat to the card as is, but I decided I wanted to add more dimension. You could have gone all out with thicker lofts of foam, but I wanted things to be more mailable, so I kept it low. The flower in the upper right was added with thin foam squares, but on the lower left corner, I decided to glue the smaller flower down to the cardbase, then pop the larger flower up on some thin foam squares. Even though I used thin foam squares, having the smaller flower glued down below the larger one really helped to add a visual impact.
All that was left for this card was my sentiment and a little bit of sparkle. I decided to stamp the 'with love' sentiment in Jet Black ink, die cut it with the coordinating die, and stick it on the center of my card front with thin foam squares. I love this placement becasue the sentiment feels so nestled in! For the sparkle, I pulled out the Clear Iridescent Stellar Sequins and added a variety of sizes around the card front. Adding sequins can be tricky, but I focused on making triangles--for example, around the sentiment there are three sequins. Not only does this draw the eye to the sentiment, but it also adds more connection between the upper and lower floral clusters while tying it into the middle. With the sequins glued on, my third card was completed!
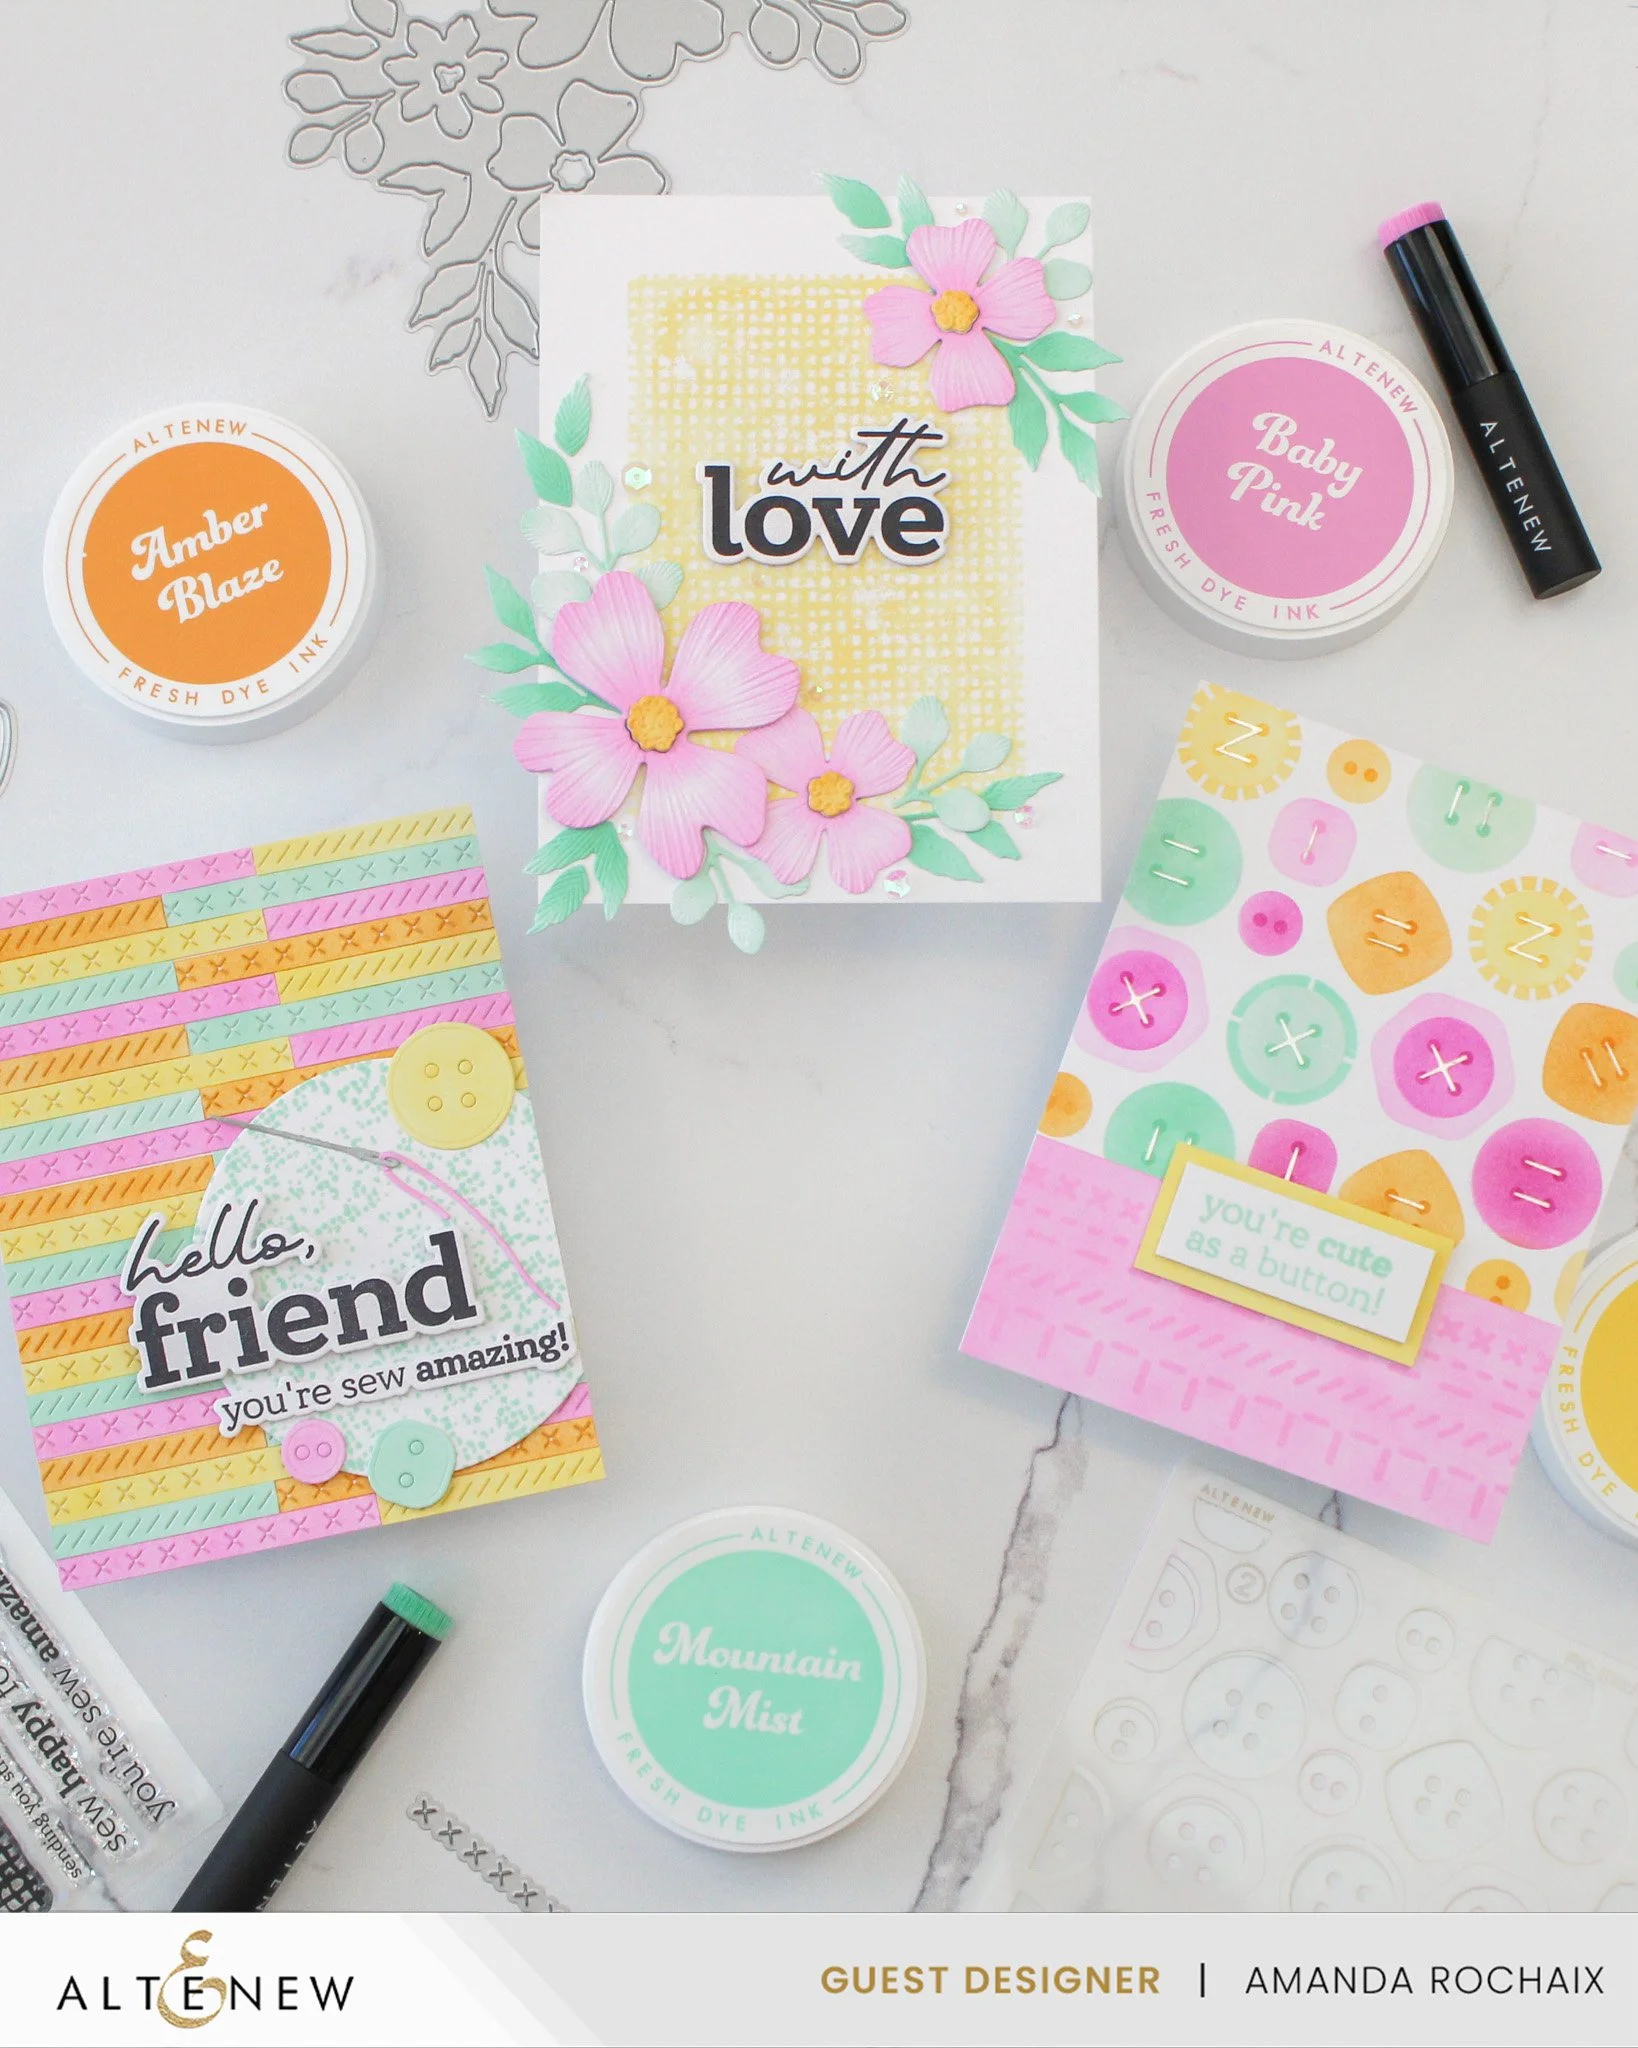
That wraps up this post! I hope you loved these cards just as much as I do and that I did a good job showing you just how versatile these Craft Your Life Project Kits are! If I inspired you to create with this kit, please tag me on Instagram at @mycraftydaydreams so I can see what you made! Big thank you again to Altenew for having me as a guest designer on the blog this month!
Affiliate disclaimer: all links to Waffle Flower, Concord & 9th, Altenew, Scrapbook.com, and Spellbinders products are affiliate links. These links allow me to get a commission at no extra cost to you if you use them to shop! All other links provided are links to supplies and shops I am not affiliated with and I do not get a commission from.